• About
    • Meet Summer
    • Design Services
    • Collaborate
  • House + Home
    • Our Home
    • DIY
    • Home Decor
    • Home Of The Month
  • Style + Beauty
    • Outfits
    • Get The Look
    • Products I Love
  • Food + Drink
    • Food
    • Drink
    • Entertaining
  • Life + Travel
    • Family Life
    • Favorite Things Friday
    • Goals
    • Holidays
    • Roadtrip Reality
  • SHOP
    • Favorite Retailers
    • Shop Our Home
    • Bloglovin
    • Email
    • Facebook
    • Instagram
    • Pinterest
    • Twitter

Simple Stylings

Simple Style for Your Home and Life

DIY Faux Flower Metal Letter

on September 8, 2014 in DIY Projects/ Fall Projects & Decorating/ Home Decor 48

Happy Monday Y’all!

I’m so excited about this project I can hardly stand it!!! Well…I may be more excited that I completed an entire project ~ start to finish ~ in one weekend!!!

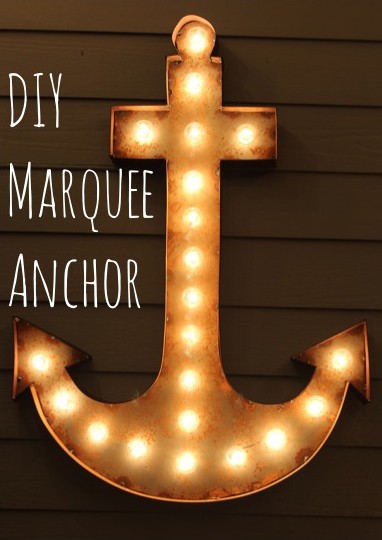
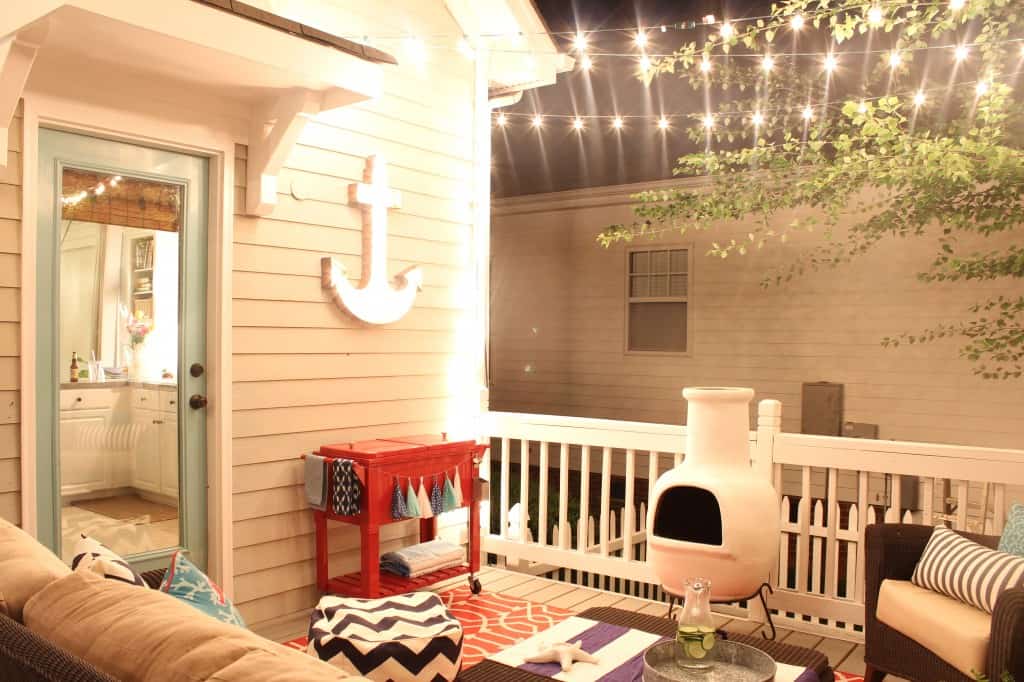
I’ve had my eye on these metal letters at Hobby Lobby for awhile but I wasn’t sure where I would use one in my house. And, I already DIY’ed the metal marquee anchor on my deck so I definitely wanted to do something different.

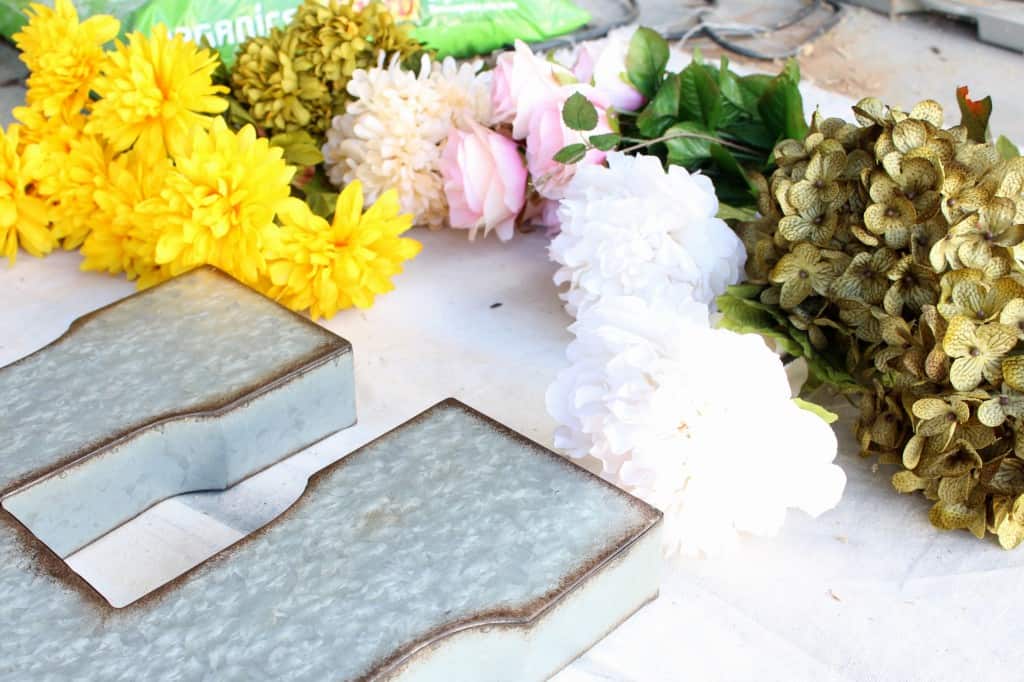
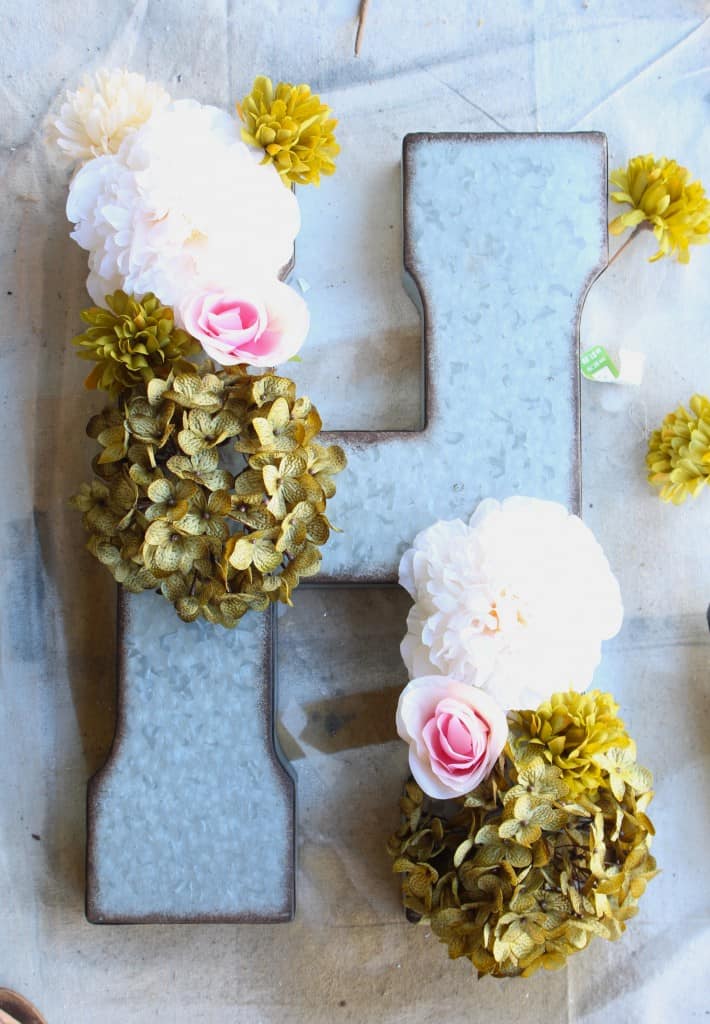
Faux flowers have really been on my mind a lot lately too and when I was looking around Hobby Lobby they had some really great ones. So I decided I would gather a bunch of fun flowers and attach them to the metal ‘H’. I also got some of the flowers at Walmart and Michael’s too.

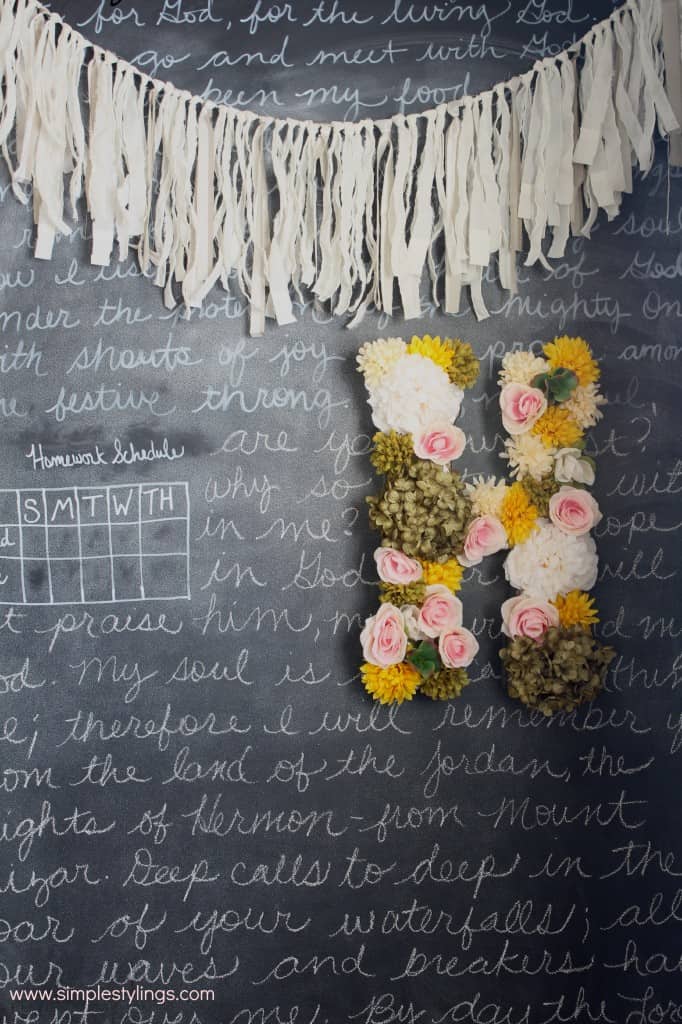
These aren’t my typical fall colors (or any colors that I normally use) but I liked the combination of the whites and greens with pops of pink and yellow.

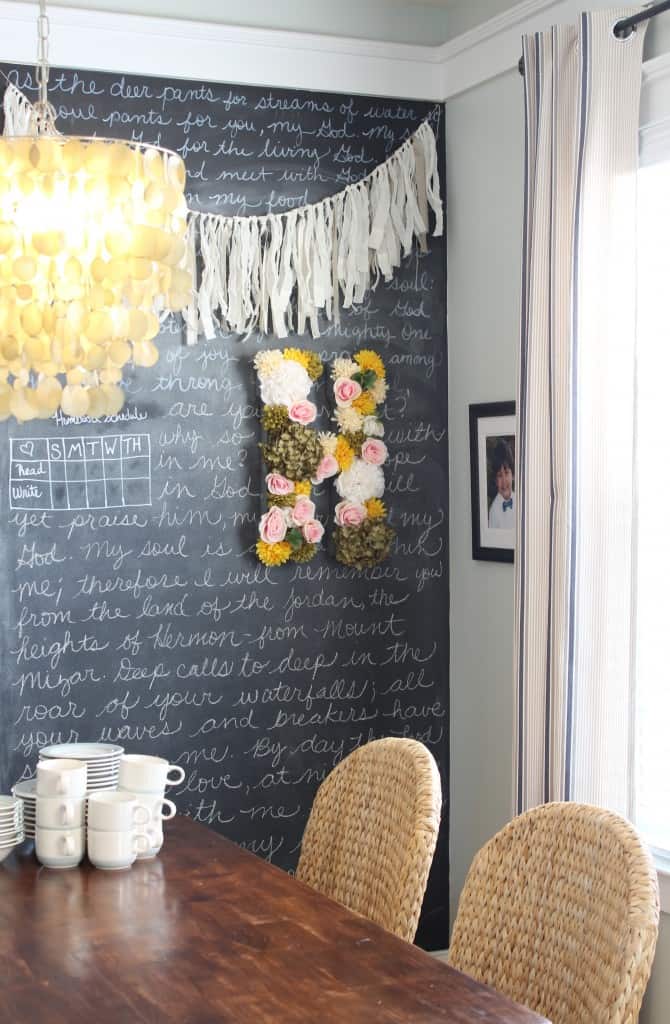
I also decided to write one of my favorite scriptures, Psalm 42, down the entire wall. I’m not sure why, this just came to my mind and I thought it would look really cool to span the whole wall.

I love these verses because they’re full of doubt and struggle but ultimately end in love and hope. Isn’t that what life is about? Struggle and hope to persevere?

diy faux flower letter

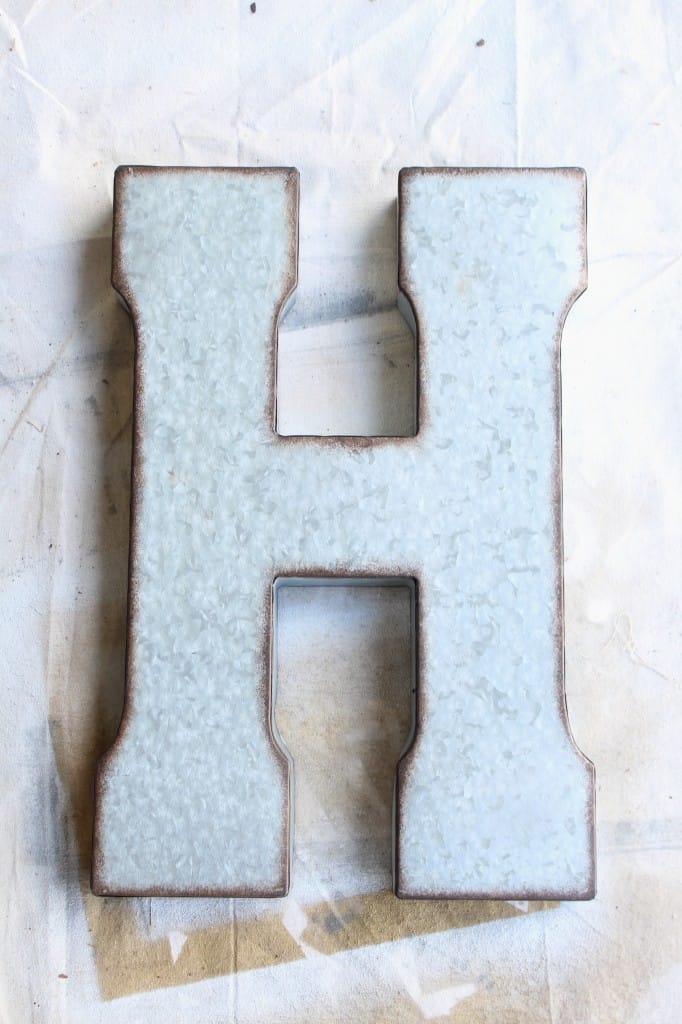
I started with this metal ‘H’ from Hobby Lobby. It was $29.99 but I used my 40% off coupon of course!

faux flower letter 1

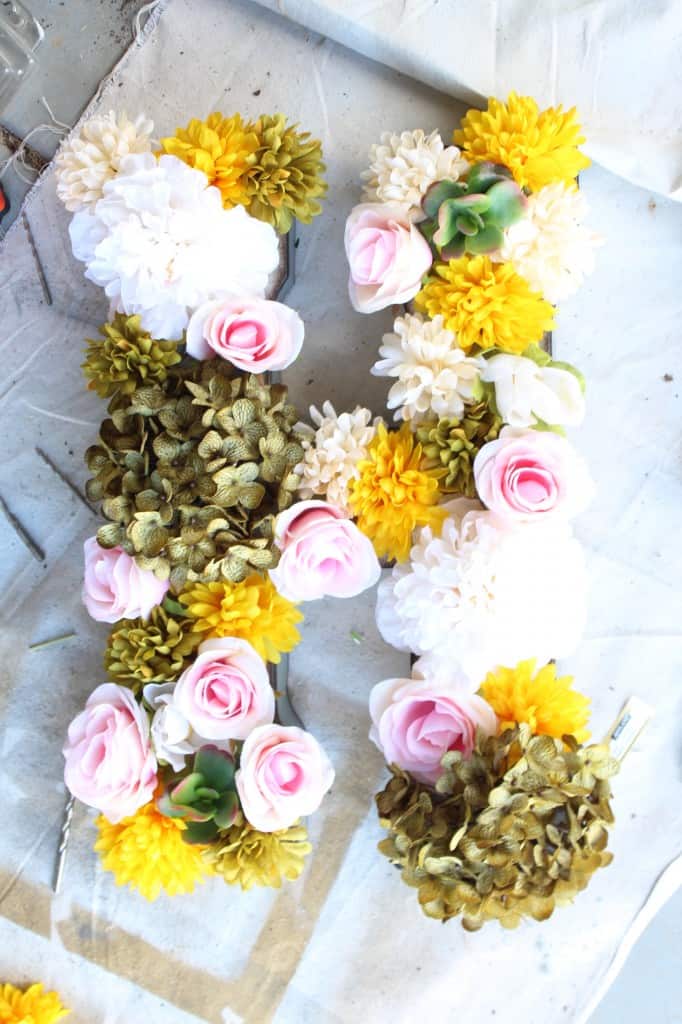
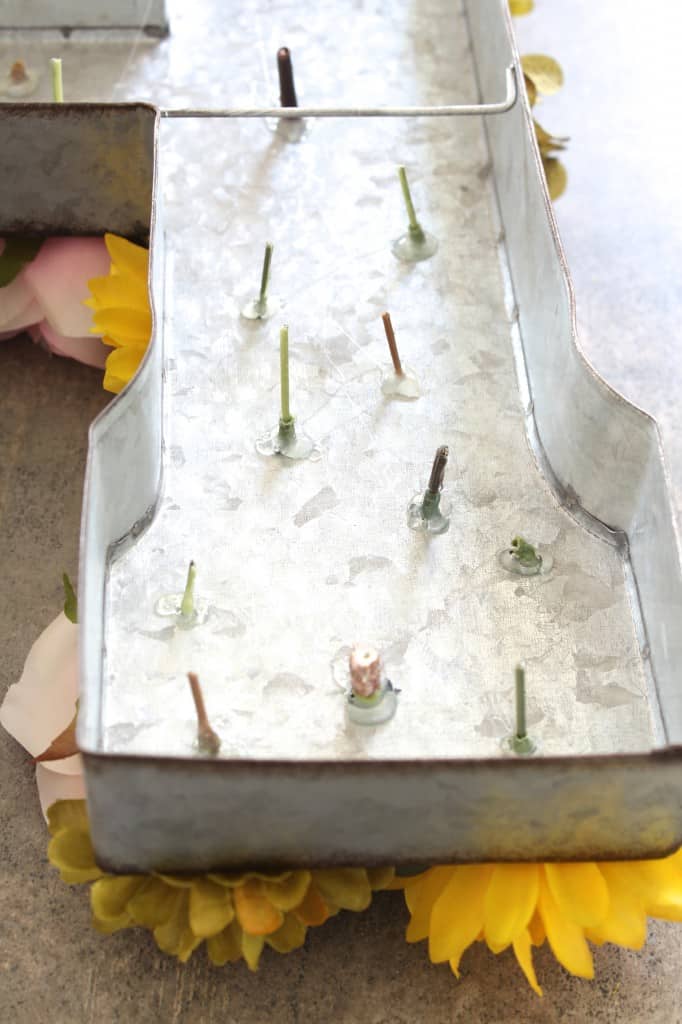
I laid my flowers out to get an idea of where I wanted them. Then I cut them off the branches with wire cutters leaving about a 1 inch stem.

faux flower letter 2

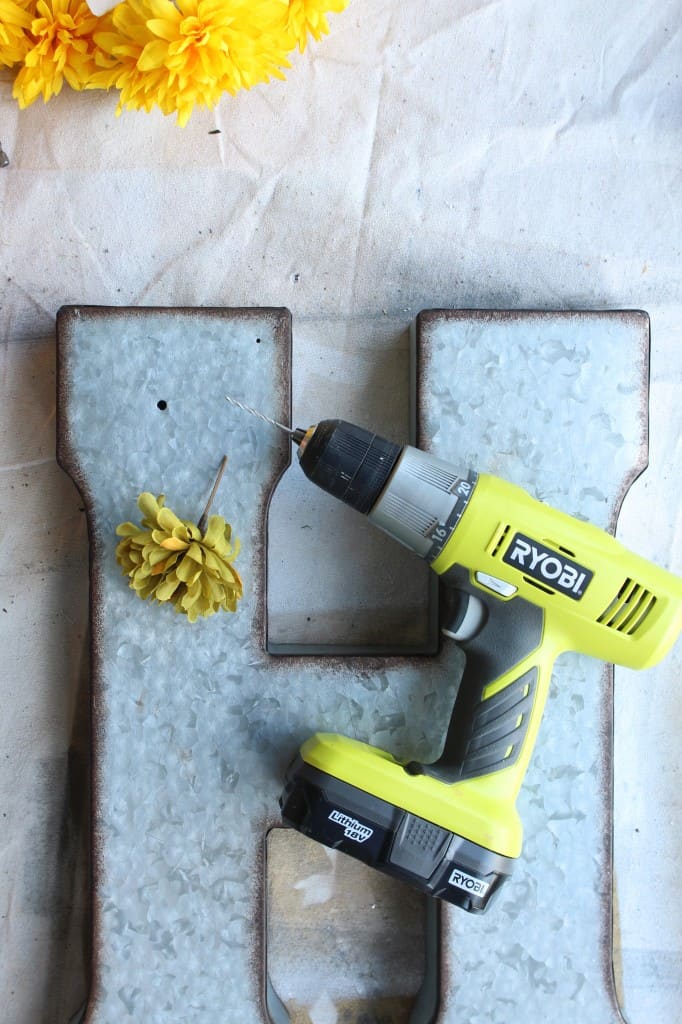
I drilled holes with different sized drill bits according to the size of the flower’s stems. I would drill a hole then put the flower in to see where I wanted the next one and and repeated until the letter was covered.

faux flower letter 3

faux flower letter 4

faux flower letter 5

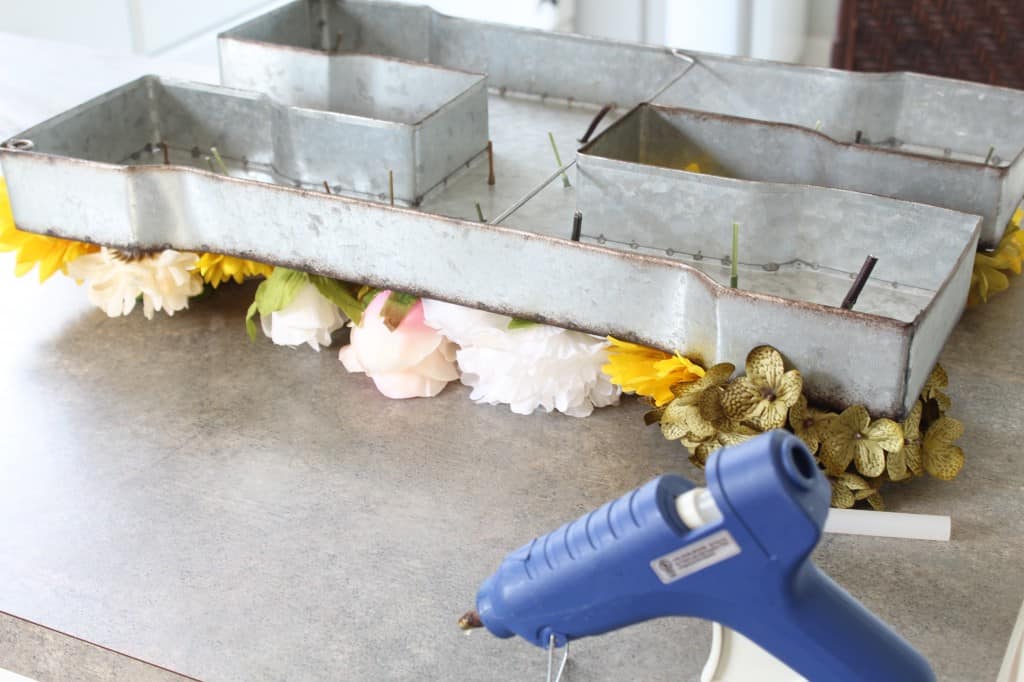
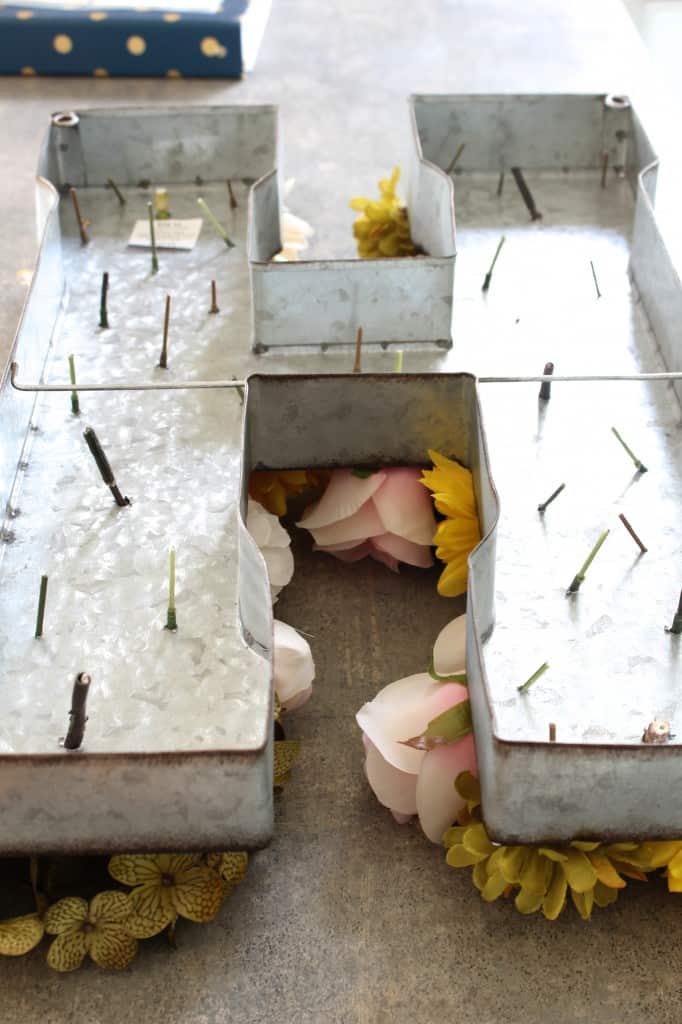
Once all the flowers were in I gently turned the letter upside down. With my hot glue gun I glued generously around the edge of the holes where the stems came through and held the stems in place until the glue was dry.

faux flower letter 6

faux flower letter 7

faux flower letter 8

I like how you can’t see the metal from the front but you can still get a little bit of the rustic metal look on the sides.

IMG_9301

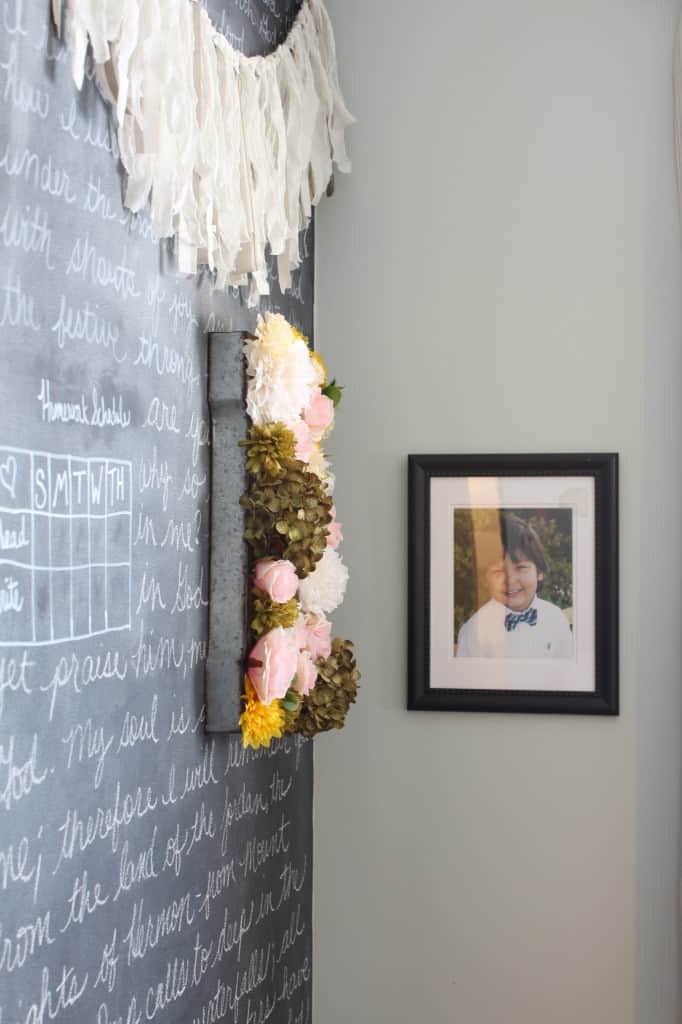
I love the vibe of this little wall in our small dining space now! Of course I had to work around our homework schedule! I asked little man if I could erase it but he wasn’t having it :)

IMG_9297

What do you guys think? I also made this fabric garland that I’ll post about later this week!

You can check out our marquee anchor tutorial for another metal letter DIY that we hung outside on our new deck!

DIY Marquee Anchor

Deck Makeover

siggy

LINKING UP:

Naptime Creations // Restless Arrow // Place Of My Taste // Made To Be A Momma // Elegance and Enchantment //

Related posts:

Default ThumbnailEasy DIY Fall(ish) Wreath Nordstrom Anniversary Sale Sneak Peek Kitchen Renovation: Unfinished Oak Cabinets Master Bedroom Makeover Reveal
&url=" title="Click to share this post on Twitter">Tweet It Pin It Share It
Filed Under: DIY Projects, Fall Projects & Decorating, Home Decor 48 Comments
❮❮ Previous Post
Next Post ❯❯

Comments

  1. Fabrication says

    October 16, 2021 at 6:33 am

    Love this!! I just made my own blog on this too. They’re so pretty and easy to make! Love the colours you used.

    Reply
  2. [email protected] says

    September 16, 2014 at 3:49 pm

    Thank you for linking up with us. Feauring your amaizng work tomorrow at Work It Wednesday!Xo

    Reply
    • Simple Stylings {For The Semi-Creative Mind} says

      September 17, 2014 at 1:07 am

      Thanks so much sweet friend!!!

      Reply
  3. Lauren Anderson says

    September 10, 2014 at 4:27 pm

    This is great!

    Reply
    • Simple Stylings {For The Semi-Creative Mind} says

      September 10, 2014 at 5:17 pm

      Thanks so much Lauren!!

      Reply
  4. Heidi says

    September 10, 2014 at 11:01 am

    What a creative idea! Adorable.

    Reply
    • Simple Stylings {For The Semi-Creative Mind} says

      September 10, 2014 at 11:17 am

      Thanks so much Heidi!

      Reply
  5. Bethany @ Dwellings By DeVore says

    September 10, 2014 at 7:33 am

    Love this Summer! I think I need to make one of my daughter’s room!

    Reply
    • Simple Stylings {For The Semi-Creative Mind} says

      September 10, 2014 at 9:28 am

      Thanks Bethany! I think it would look great in a little girls room!

      Reply
  6. Mallory says

    September 9, 2014 at 8:00 pm

    Love this!! The whole situation is so pretty! pinned :)
    xo

    Reply
    • Simple Stylings {For The Semi-Creative Mind} says

      September 10, 2014 at 9:31 am

      Aww, thanks Mal!!

      Reply
  7. Christa Threlfall (@BrownSugarToast) says

    September 9, 2014 at 8:40 am

    Wow – That whole wall is lovely!

    Reply
    • Simple Stylings {For The Semi-Creative Mind} says

      September 10, 2014 at 9:32 am

      Thanks Christa :)

      Reply
  8. Melinda @Home.Made.Interest says

    September 8, 2014 at 10:27 pm

    Stopping by from Create Link Inspire party. Super cute! This would adorable in my daughters room:)

    Reply
    • Simple Stylings {For The Semi-Creative Mind} says

      September 8, 2014 at 10:32 pm

      Thanks so much Melinda! I really appreciate you stopping by!

      Reply
  9. Lisa @ Shine Your Light says

    September 8, 2014 at 9:48 pm

    Summer, I love your flower and I love the chalkboard wall and psalm!

    Reply
    • Simple Stylings {For The Semi-Creative Mind} says

      September 8, 2014 at 10:50 pm

      Thanks so much Lisa!

      Reply
  10. Rachel says

    September 8, 2014 at 9:46 pm

    Love it!!! Just like everything else you do!!

    Reply
    • Simple Stylings {For The Semi-Creative Mind} says

      September 8, 2014 at 10:50 pm

      Thanks Rach!

      Reply
  11. Tina @ What We Keep says

    September 8, 2014 at 7:39 pm

    Wow! I’m loving this idea. You are a very smart cookie. ;)

    Reply
    • Simple Stylings {For The Semi-Creative Mind} says

      September 8, 2014 at 10:53 pm

      Thanks so much Tina :)

      Reply
  12. Amy W says

    September 8, 2014 at 11:24 am

    Love how this turned out!

    Reply
    • Simple Stylings {For The Semi-Creative Mind} says

      September 8, 2014 at 11:02 pm

      Thanks so much Amy!!

      Reply
  13. Amber says

    September 8, 2014 at 10:23 am

    I love this!!!! So cute and such an impact! Love the little banner, too!!

    Reply
    • Simple Stylings {For The Semi-Creative Mind} says

      September 8, 2014 at 11:03 pm

      Thanks Amber! I really appreciate it!

      Reply
  14. Pam @ Simple Details says

    September 8, 2014 at 10:12 am

    Such a great idea, Summer! What a pretty statement to add to your chalkboard wall!

    Reply
    • Simple Stylings {For The Semi-Creative Mind} says

      September 8, 2014 at 11:03 pm

      Thanks so much Pam!!

      Reply
  15. Converse says

    September 8, 2014 at 9:58 am

    Seriously… you’ve done it again! This is so lovely and fun (and fresh as we descend into fall)!

    Reply
    • Simple Stylings {For The Semi-Creative Mind} says

      September 8, 2014 at 11:03 pm

      Aww thanks Converse! You’re sweet :)

      Reply
  16. Heidi @ Parties for Pennies says

    September 8, 2014 at 9:44 am

    Summer…I adore this!! It would even be so pretty to leave some of the space the metal part and just add a few pretty flowers. Simple & stunning! <3 Heidi

    Reply
    • Simple Stylings {For The Semi-Creative Mind} says

      September 8, 2014 at 11:03 pm

      Thanks so much Heidi!!

      Reply
  17. [email protected] says

    September 8, 2014 at 9:37 am

    So cute!!! My wheels are churning! I love this! xox, Emily

    Reply
    • Simple Stylings {For The Semi-Creative Mind} says

      September 8, 2014 at 11:04 pm

      Thanks Emily :)

      Reply
  18. [email protected] says

    September 8, 2014 at 9:28 am

    So pretty! Love it

    Reply
    • Simple Stylings {For The Semi-Creative Mind} says

      September 8, 2014 at 11:04 pm

      Thanks Julia!!

      Reply
  19. cassie says

    September 8, 2014 at 9:04 am

    i am so excited about this, too!!! i LOVE LOVE LOVE one more time LOVE it!

    Reply
    • Simple Stylings {For The Semi-Creative Mind} says

      September 8, 2014 at 11:04 pm

      You’re the best! Thanks Cass!

      Reply
  20. Beth says

    September 8, 2014 at 8:28 am

    Summer this might be my favorite DIY of yours ever!! So pretty against that chalkboard wall!

    Reply
    • Simple Stylings {For The Semi-Creative Mind} says

      September 8, 2014 at 11:05 pm

      You’re so sweet! Thanks Beth!!

      Reply

Trackbacks

  1. De letras y flores says:
    May 1, 2018 at 5:59 am

    […] Muchos de los enlaces que compartimos hoy contienen tutoriales con los que podrás realizar esta manualidad en casa, fotos: 1, 2, 3, 4, 5, 6 […]

    Reply
  2. Work it Wednesday No. 65 | The Turquoise Home says:
    September 29, 2016 at 10:23 pm

    […] DIY FAUX FLOWER METAL LEATHER by SIMPLE STYLINGS| GREEN BEADED WREATH by DELINEATE YOUR DWELLINGS […]

    Reply
  3. Blogger Stylin' Home Tours: Fall 2014 - Simple Stylings says:
    September 25, 2014 at 11:27 pm

    […] yellow and green in my DIY faux flower letter still works with the fall decor and the chalkboard wall always gives a cozy […]

    Reply
  4. WORK IT WEDNESDAYS says:
    September 17, 2014 at 9:02 am

    […] DIY FAUX FLOWER METAL LEATHER  by SIMPLE STYLINGS| GREEN BEADED WREATH by DELINEATE YOUR DWELLINGS […]

    Reply
  5. Work it Wednesday No. 65 says:
    September 17, 2014 at 9:01 am

    […] DIY FAUX FLOWER METAL LEATHER by SIMPLE STYLINGS| GREEN BEADED WREATH by DELINEATE YOUR DWELLINGS […]

    Reply
  6. Easy DIY Fall(ish) Wreath - Simple Stylings says:
    September 15, 2014 at 7:16 am

    […] you saw my DIY faux flower letter the other day you know that I went with very feminine florals which isn’t your typical fall […]

    Reply
  7. Click It 13 (And Some Shameless Soliciting for a Vote) - Primitive and Proper says:
    September 12, 2014 at 6:02 am

    […] 1. I shared Summer’s amazing home tour yesterday, but I wanted to highlight this fun DIY she shared this week- a faux flower metal letter! […]

    Reply
  8. My Home Tour at Primitive & Proper - Simple Stylings says:
    September 11, 2014 at 7:14 am

    […] you missed my latest projects make sure you check out the DIY faux flower letter and gilded […]

    Reply
  9. It's Eclectic: Simple Stylings says:
    September 11, 2014 at 6:00 am

    […] is our small dining area that I just spruced up with this faux flower letter and fabric […]

    Reply

Leave a Reply Cancel reply

Your email address will not be published. Required fields are marked *

Recipe Rating


This site uses Akismet to reduce spam. Learn how your comment data is processed.

I’m Summer, a mom and a creative at heart, and my hope is that I can help you create simple style for your home and life. Read more!

Join Our Email Newsletter

Popular Posts

Categories

  • Bloglovin
  • Email
  • Facebook
  • Instagram
  • Pinterest
  • Twitter
Home | About | Collaborate | Connect

Copyright © 2015 • Simple Stylings