DIY Reupholstered Office Chair

Happy Friday friends! I have been consumed with my deck project for the One Room Challenge lately but I am still working on my modern coastal studio/office project too! You can read my office inspiration post here if you missed it.
The office is almost complete and I have a ton of DIY projects to share with you…if only I could find the time to get them all written :)
Hopefully after the ORC reveal I can post the remaining projects and the office reveal around the beginning of June.
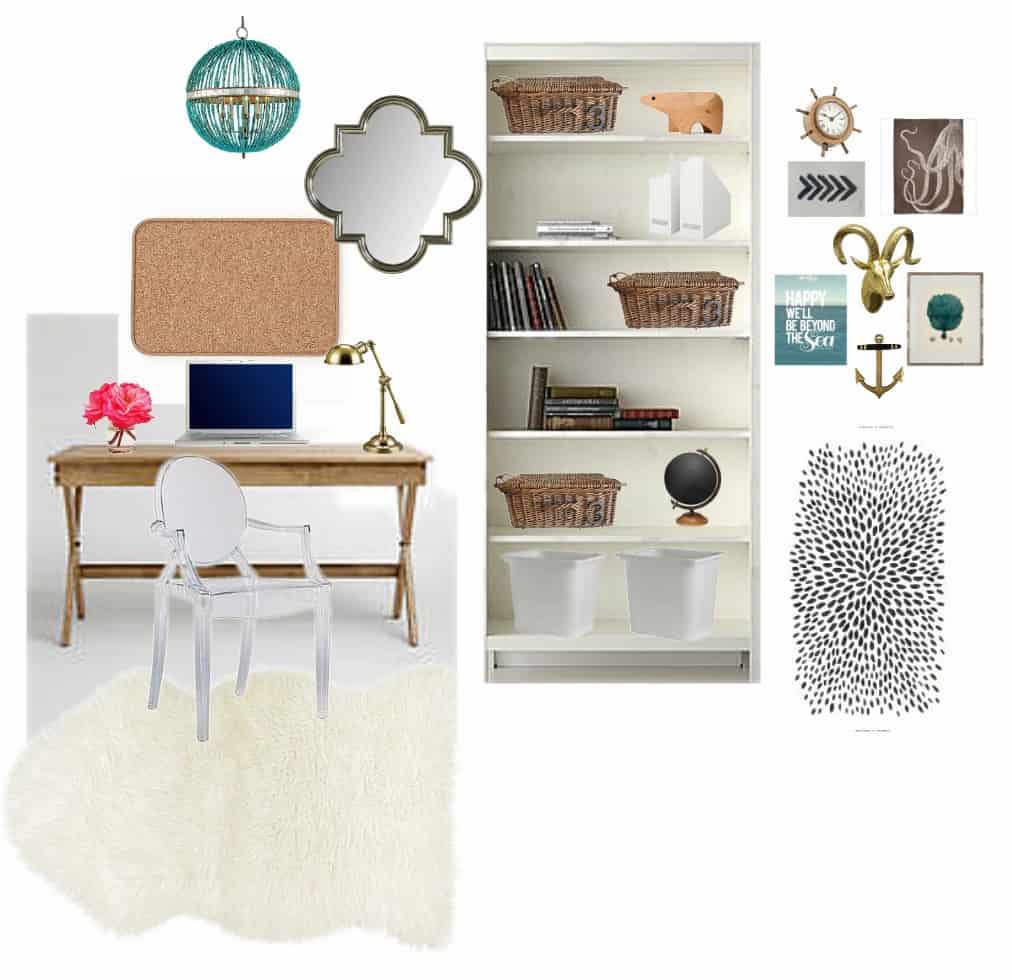
You’ve seen my DIY pallet and sawhorse desk. Now let’s talk about my desk chair.
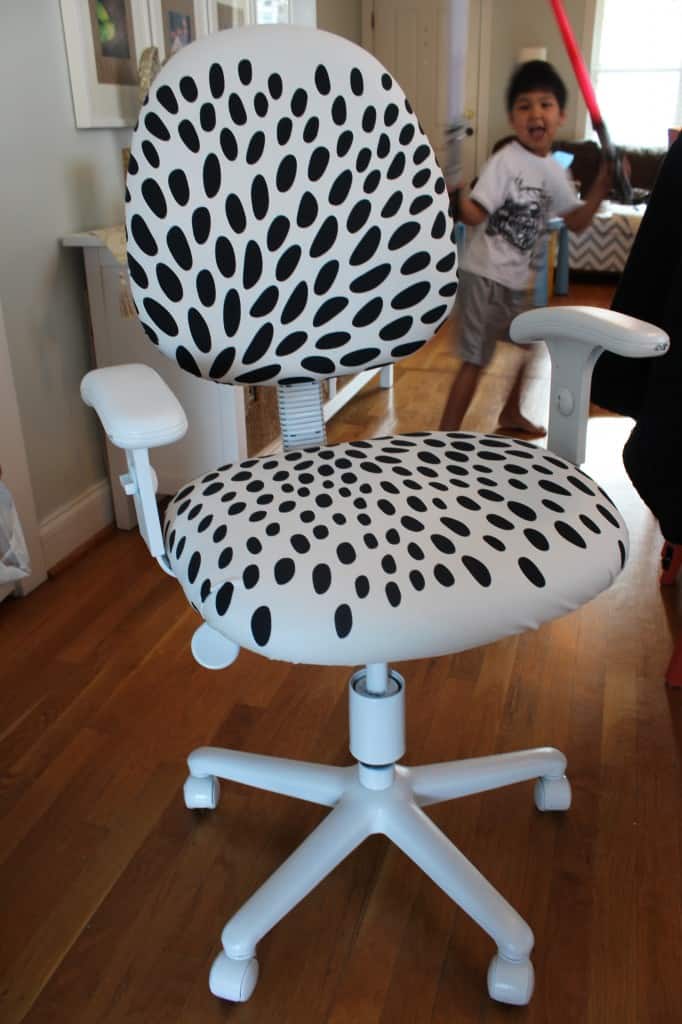
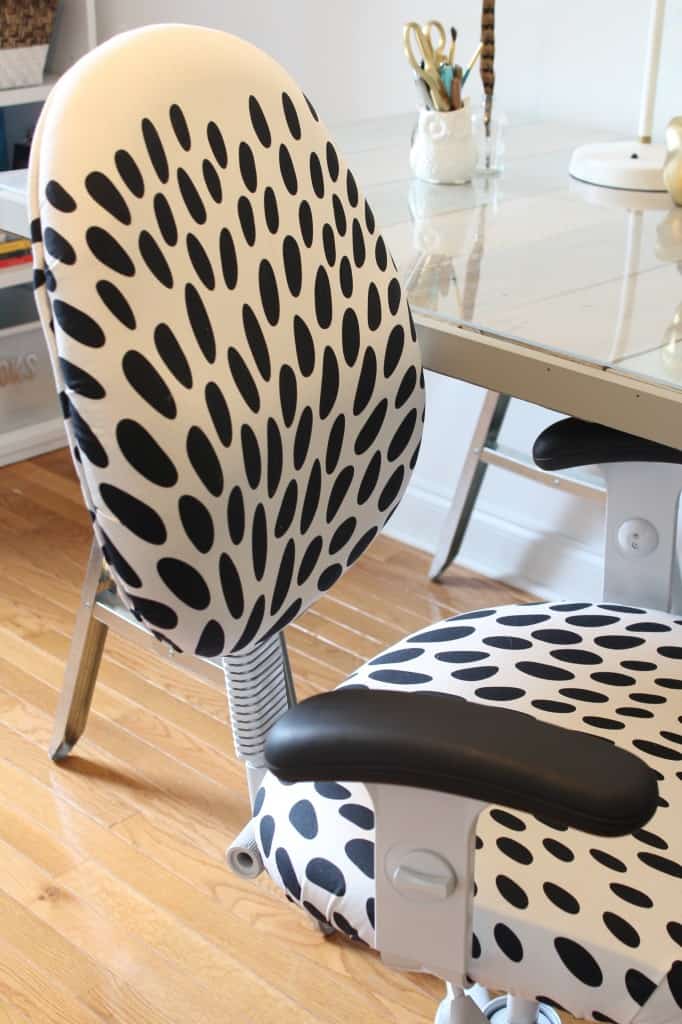
You can see the ghost chair above that I had planned for the space, but what you don’t know is that the ghost chair was actually plan B if my DIY office chair was a big fat fail. I would LOVE to have the ghost chair {and I may have secretly hoped that the DIY chair would flop so I could buy it :) } but I snagged this office chair from our local Restore for $10 so in the interest of budget I had to try out my first “reupholstery” job if you will.

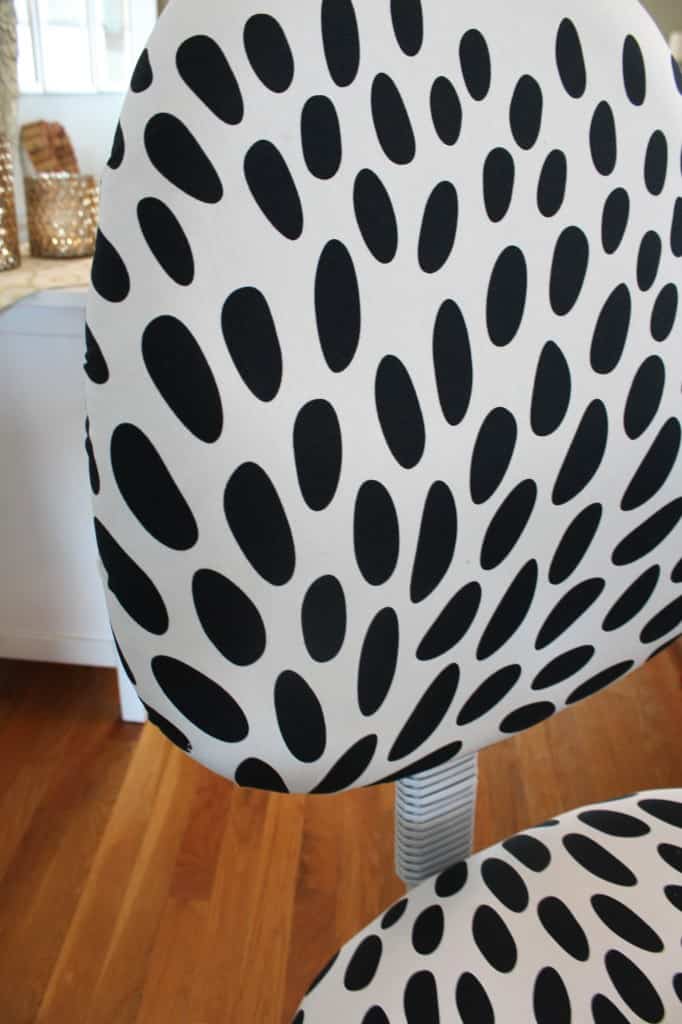
I also had some leftover Ikea dot fabric which kept the cost down even more so I got to work.
First I unscrewed both chair pads from the frame.

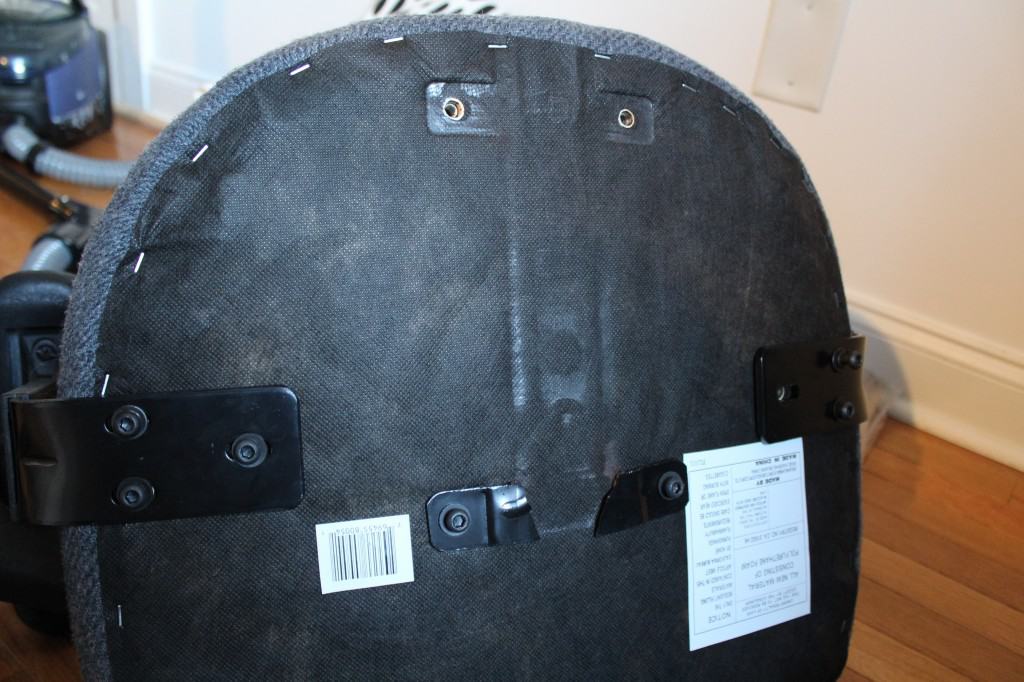
If you look at the first picture of the chair you can see that the back of the frame is screwed into the upper chair pad. Once I unscrewed the pad I just pulled the too pieces apart.
When I was looking for a chair I specifically looked for one like this because I thought it would be easier to work with instead of one where the chair pad with a single piece.
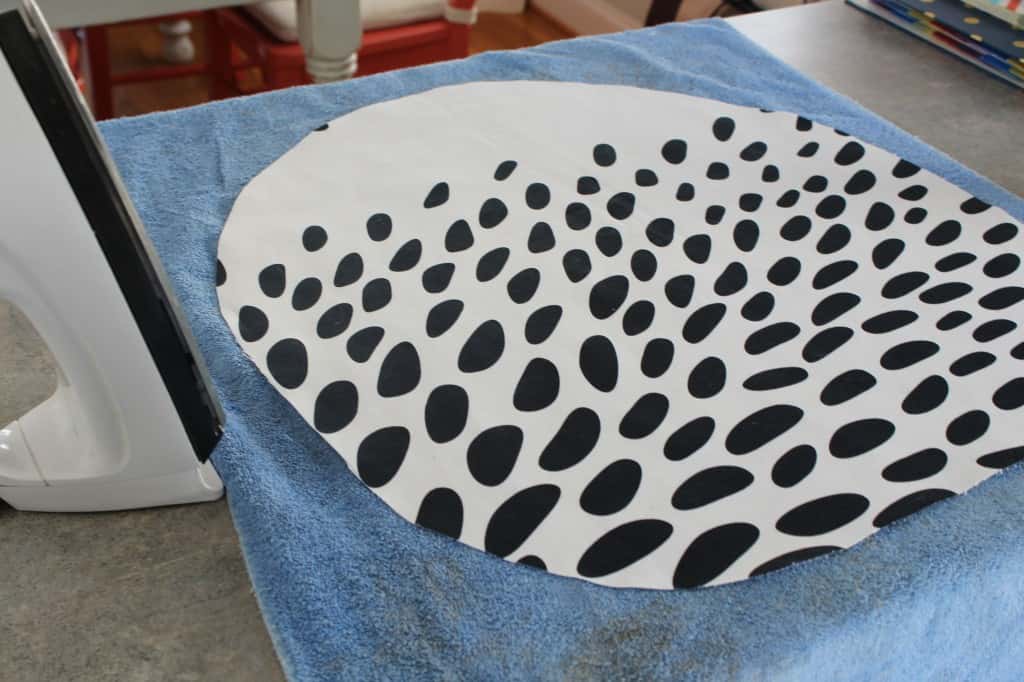
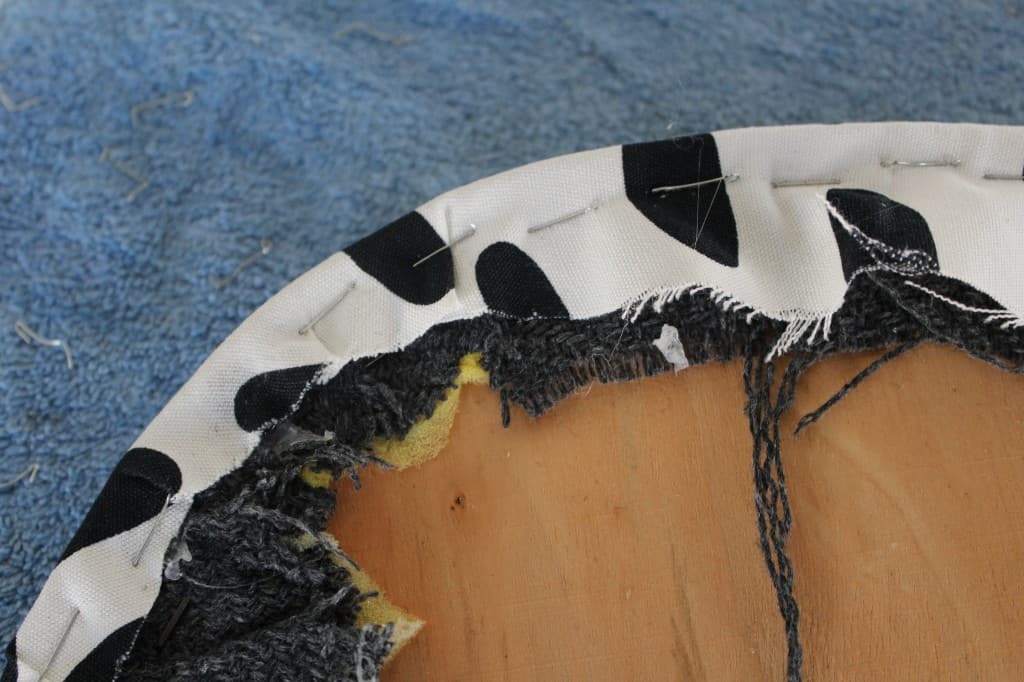
Next I laid the pads on the fabric and traced them with a few inches to spare so that I could fold the fabric over and staple. You can eyeball this or use a measuring tape.
I also ironed the wrinkles out of the fabric before I started.
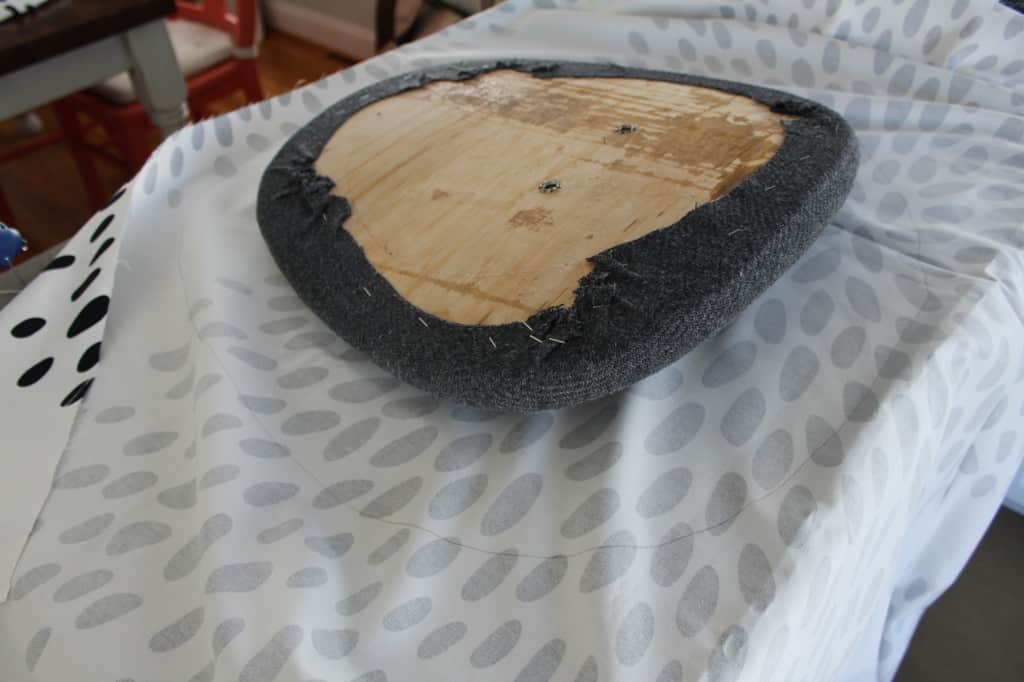
I flipped the pads over and pulled the material tight and stapled the edges. I worked my way around the pads slowly, trying to avoid folds and wrinkles.
My staple gun is not the best in the world so I used my trusty hot glue gun to reinforce a few areas.
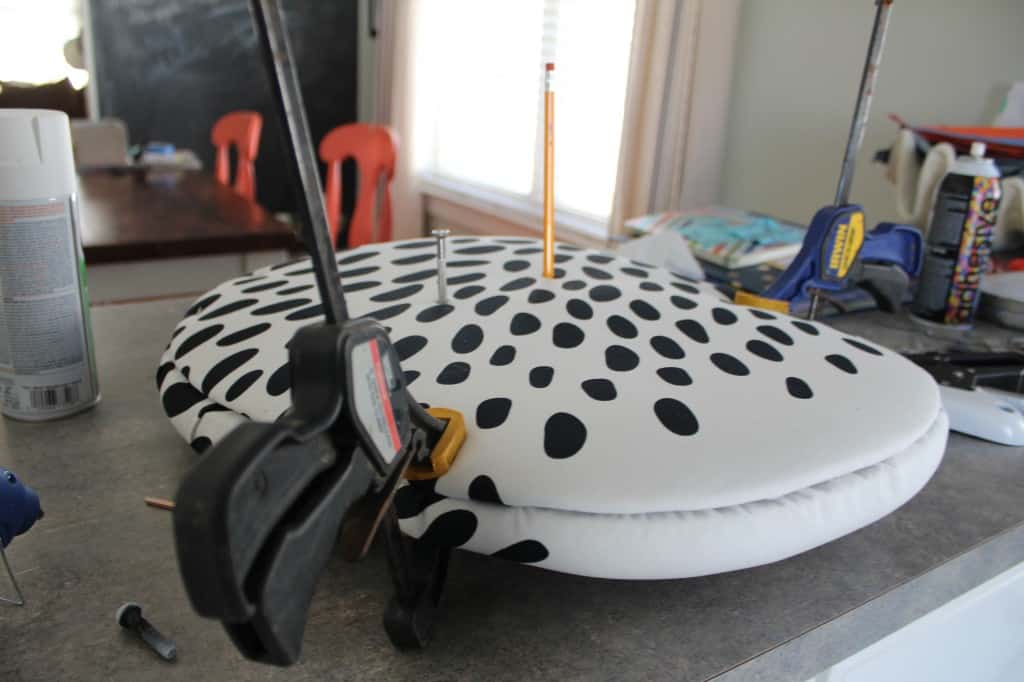
I wasn’t sure the best way to attach the two pieces back together because I didn’t have the proper staple or nailer tools. The frame screws actually screw all the way through one pad and into the second pad so it didn’t need much to hold the them together.
I decided to try and hot glue the edges and and clamp the two pieces together so the glue would dry tight. Once the glue was dry I screwed the pads back to the frame. Surprisingly it worked and it hasn’t separated.
I used the same method on the bottom pad except there was only one piece instead of two so I just had to staple the fabric underneath.
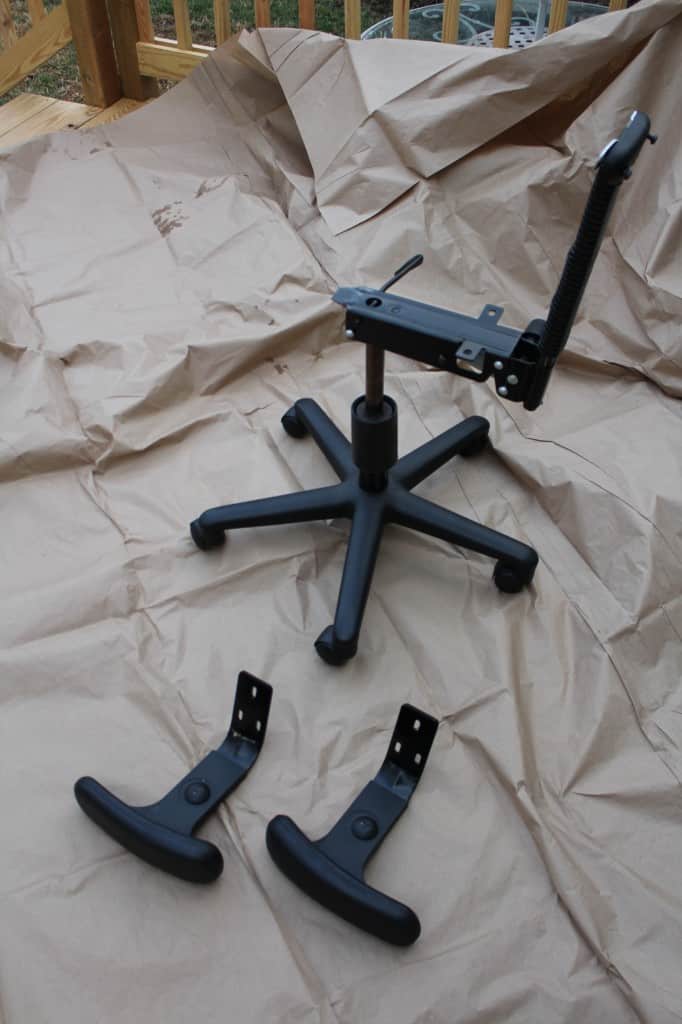
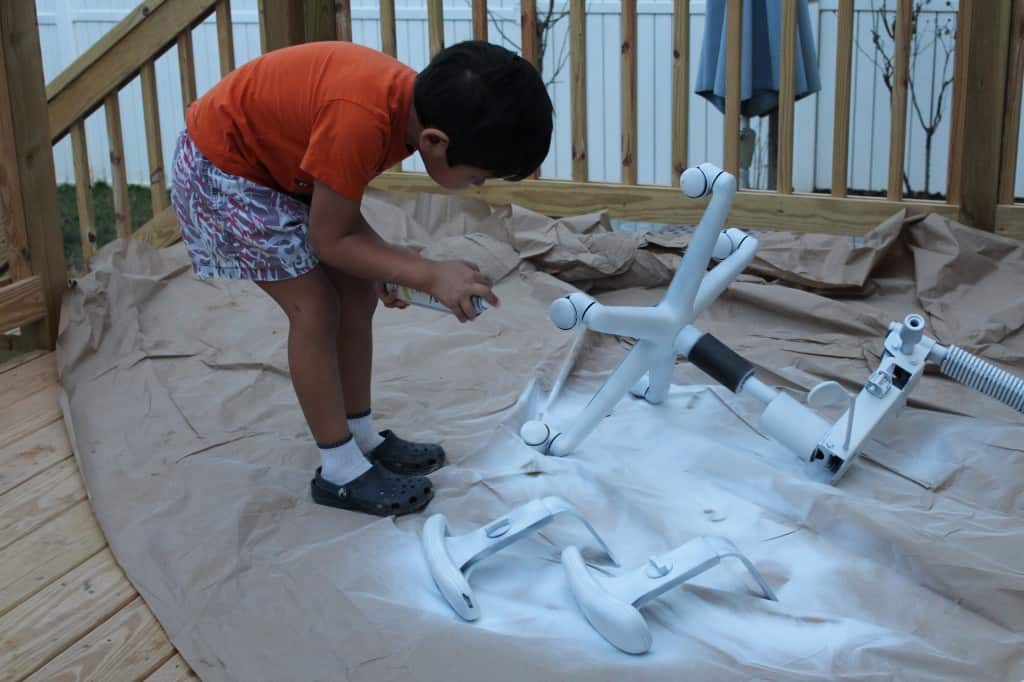
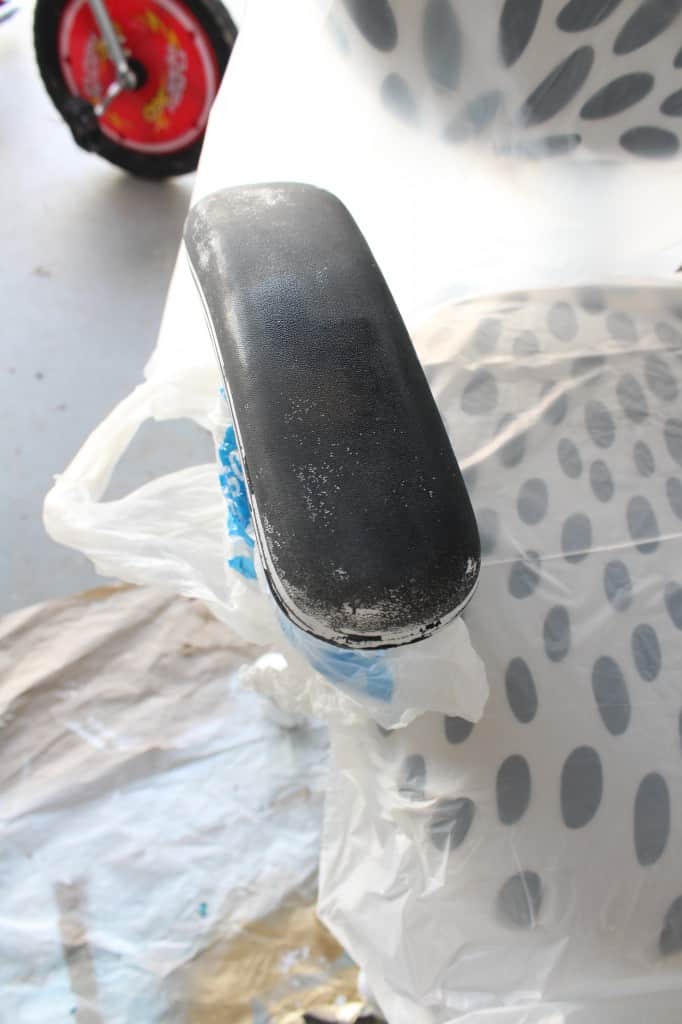
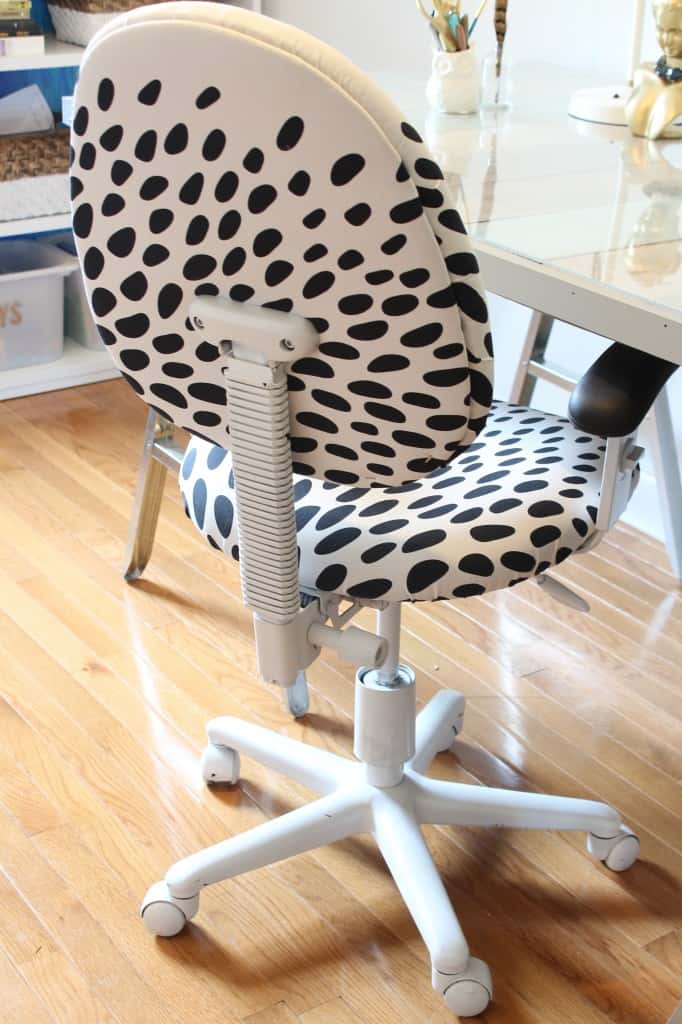
I wanted the frame to be white so I spray painted it with a coat of plastic primer, then two coats of gloss white paint.
So here it is! Pretty bold, huh,? To be honest I’m still getting used to it but I think it’s going to work in the space but I think it turned out so cute!
I had to give it a shot, right? Honestly I wasn’t sure how it was going to hold up because the chair isn’t that great to begin with but it worked.
Check out my Jedi knight photo bomber :)
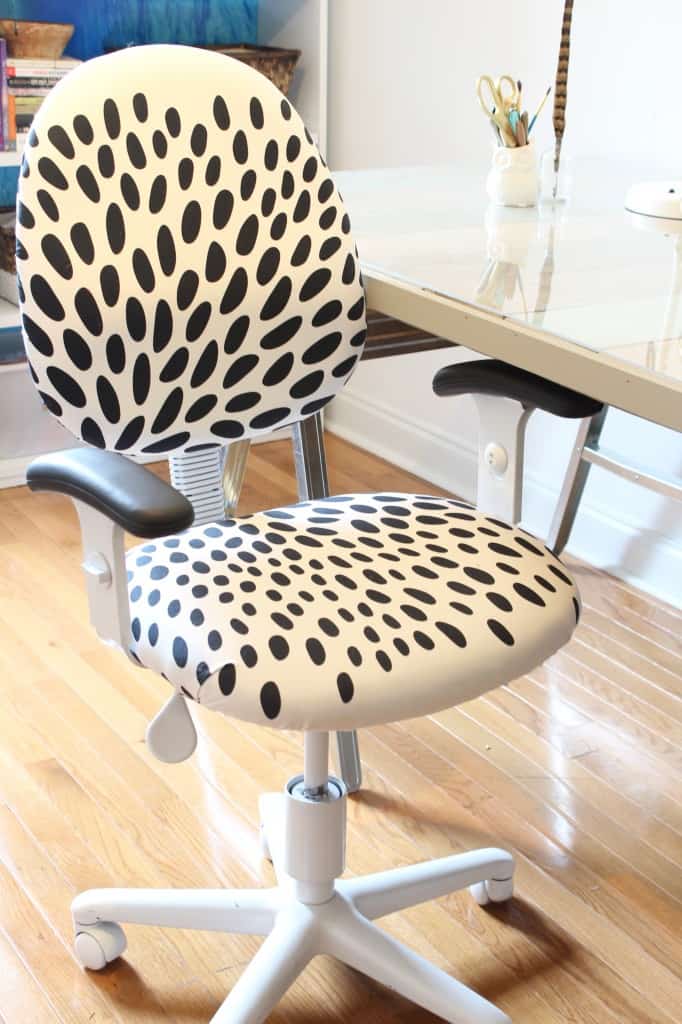
Except…the arm rests! The arms are squishy so every time I put my elbows on them the paint would crack a little and then it started to peel.
Although I really wanted the arms to stay white I decided to sand them down and spray paint them black instead. I’m not sure why but the black paint held up much better.

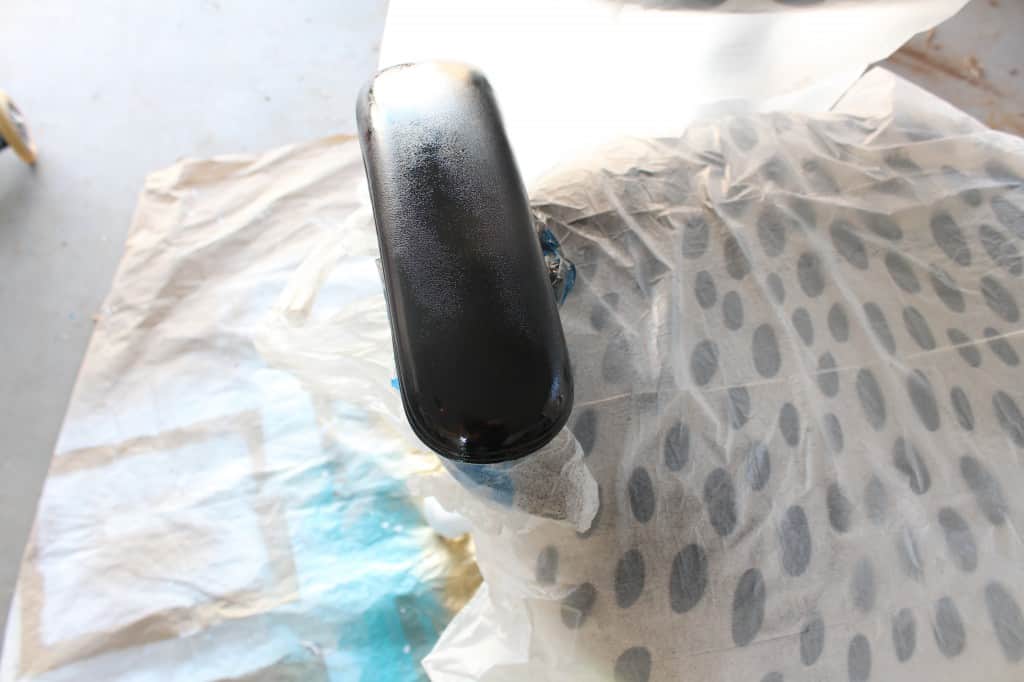
Here it is again, only with black arms instead and it has held up perfectly with no signs of cracking or peeling. I guess I won’t be getting my ghost chair…yet :)

Let me know what you think! Why not go grab a $10 office chair or one that you already have and recover it with your favorite fabric for a simple update?
LINKING UP:
Design Dining and Diapers // Liz Marie Blog // DIY Show Off // Nap Time Diaries // Upcycled Treasures // Remodelaholic // I Heart Nap Time
and


This is a clever treatment for a computer chair. I’ll try it with my computer desks as well.
I have a chair just like this! Thank you so much for this post and it was nicely done :) I will be able to cover my chair now, thanks again :)
I love the chair! I’m not sure if anyone else commented on this, but the black paint probably stuck better because you sanded the shiny finish off the arms. Black or white arms, your fabric is gorgeous on the chair! I agree that it looks very high end!
Wow, what a compliment! Thank you SO much Denise! I’m really glad you like it!
You did a wonderful job!!!
Thank you very much!
What brand of primer and paint did you use? I’m thinking of doing something similar in my classroom.
Hi Jazzmine! Sorry for the delay! I use Rust-Oleum’s primer for plastic and just their plain black spray paint. Hope that helps!
You did a beautiful job. And the black arms work like they belong. I would hate to imagine what that chair would cost custom made or in a one-of-a-kind specialty store. Good quality, blah, task chairs are selling for $800, and that wouldn’t even approach the style factor you have created. If you took that to a manufacturer to have replicated, you could sell it for that much or more. Well done! You sound a little reticent about it. Me? I’m blown away (but I can’t see the blemishes you know are there). Very nice job, and very resourceful!
Thanks so much!
Woww.. looks really great! Love the white with the fabric #inspiring
Thanks so much!
This is a great transformation. I made one too some months ago for my daughter’s desk … I am very glad I am here. Your job is fantastic!
http://artdecorationcrafting.blogspot.gr/
Thanks Christina! So glad you like it!
GORGEOUS job on this, Summer!!!
Thanks Lindsay!
Well done on this project! I bought supplies a few weeks back to change mine but I dont think the back come off… Eeek! Have to find a way to redo my cheapy chair somehow anyway. Yours looks great though!
Thanks so much MJ! That sinks about your chair! You could try and find cheap one at Habitat Restores. I know our store usually always has some.
that looks SOOO good! I love the fabric you used…{and the photo bomber, ha!} thanks for linking up to Create Link Inspire, I’ve pinned this! EMily
Thanks so much Emily! I have a constant photo bomber :)
Wow great job! Thanks for the tutorial!
Thanks so much Amy! You’re welcome :)
You hacked that chair,girl! I am loving it! I was looking for that fabric at IKEA the other day but they were out…boo!! Pinning:-) Have a great week!
Thanks so much Aniko!!! The first time I went for the fabric it was out two and I stalked them until they got more in :)
Wow, you turned such a boring, typical office chair into something so fun and refreshing! This is awesome, thank you so much for sharing at The Makers!
Thanks so much Katie! Love this party!
Your chair redo turned out amazing. The fabric you chose is AWESOME! I love black and white. So perfect. Thanks for sharing! pinning to remember.
Kristy @ 3 Peppers Recipes – Crafts, Cooking & Color
Thanks so much Kristy and I appreciate the pin! I love the Ikea fabric too :)
This looks great! I’d love to do something like this for my office!
Thanks Alex! It really was pretty easy :)
what a great idea, you can’t beat that for $10! I’ve always wanted a ghost chair too!
Thanks Bethany! At that price tag I had to give it a shot :)
I love this!! That fabric looks so good on that chair!
Thanks so much Brooke!
That looks FAB!! Can’t wait to see the entire reveal of your office!! Are those saw horses for your desk? I was thinking about making my daughter a vanity table outta saw horses….
Thanks so much Janae! They are sawhorses! Search my site for my pallet and sawhorse desk and you can see how I built it :) I love the idea of a vanity! if you don’t want the industrial sawhorses Ikea has some really great options!
You know I love this fabric! This is such a great office chair makeover! Love it!
Thanks Julia!!
Goodness, what a difference! It makes you wonder why they don’t sell them this way to start with. Why do they have to make the comfy chairs so butt ugly!! What a great idea, looks so so much better
Thanks so much Andrea and I totally agree!!
The chair is awesome! I am loving the fabric. We have a black office chair that needs a pick – me – up too. You have inspired me. As always.
Yay! Thanks Liz :)
Summer, this is so great! No way would you find an office chair that fun and fabulous in the store! Given how much I love both your desk and your chair, I’m thinking that the office reveal is going to be a stunner – can’t wait to see it!
Aww, thanks so much Kris! It is a pretty fun chair :) I’m ready for the office to be 100% finished too!
I love that bold chair! And I think the black arms make it- mistakes sometimes work out for the best!
So true Beth! Thanks :)
That is one cool chair now! Nice job. Visiting from BOTN.
Thanks so much Heather! I appreciate you stopping by and I love BOTN!
This is awesome, Summer! You’re so talented! I like the arms black better too!!
Thanks Rach! You’re sweet :)
This is too cute! I might hold onto this little chair for a while… I had a Ghost Chair as my desk chair and it was SO uncomfortable! I think it is fine if you are only sitting at your desk for short periods of time, but any longer than 30 min and it is misery. Just FYI – I wish someone had told me before I bought it! The DIY looks great. :)
Thanks so much Elizabeth! That is great to know about the ghost chair, I’ve been wondering that!