DIY Pallet and Sawhorse Desk: Tutorial
Happy Monday everyone! Finally the pallet and sawhorse desk details are here as promised!

I am going to back up just a little for those of you who may be new to Simple Stylings. I started this little blog of mine in August of this year to turn my love for decorating and DIY into more than just a hobby.
My college degree is in journalism with a concentration in photo journalism and the blog has been a perfect way to channel my passion for writing, photography and home design into one outlet. This blogging thing is not my career by any means {who knows what the future holds} but I finally feel like I am doing what I love and it actually means something and feels right to me.
I also love working with tools and if I had to put myself in a category it would definitely be more builder than crafter and I have always wanted to build something from scratch. I grew up with an incredibly skilled dad when it comes to fixing and building things which is where this passion started.
Since starting the blog I also realized I had a real need for an office space and a desk big enough for writing and crafting projects. I shopped around and after being unable to find something I liked in the size I needed I thought this would be the perfect time to give it a shot.
So I started researching online and perusing Pinterest trying to narrow down what type of desk/table I wanted. I know there are lots of popular pallet projects out there and since I am on a very tight budget I thought I should consider it. I found a couple of pallets desks that I really fell in love with and started to think that I could actually make this work.
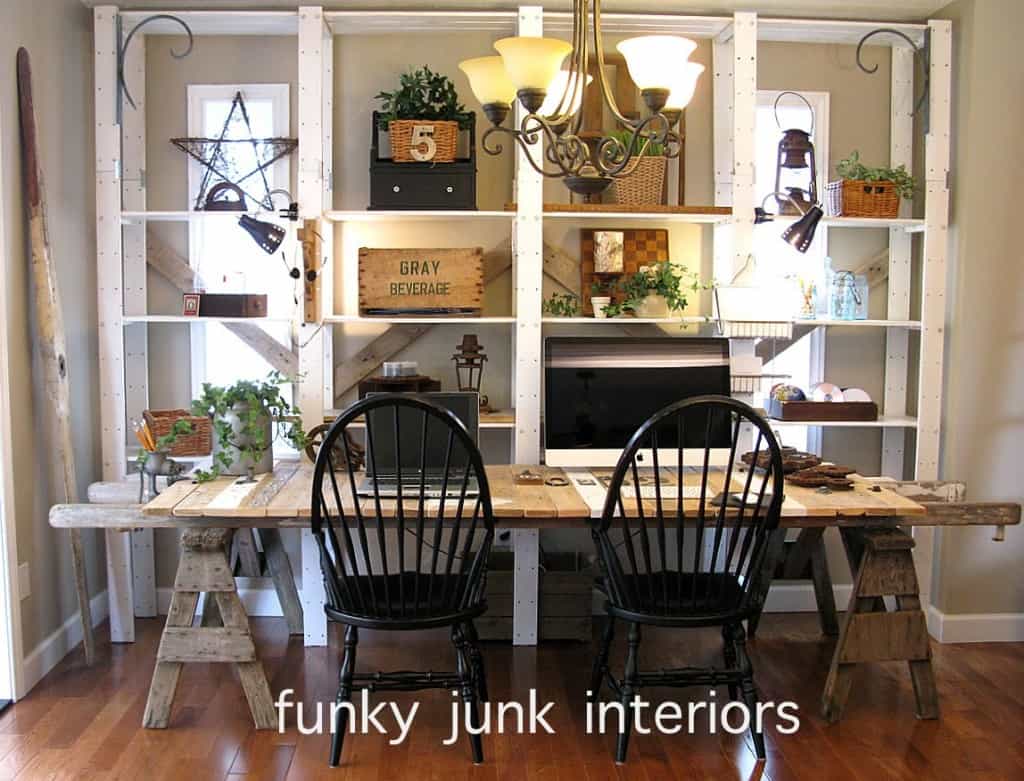
The first inspiration desk was this one by Funky Junk Interiors. I love the size and the rustic feel and the sawhorse legs are genius! I thought the sawhorses gave the desk such a unique touch, created a lot of leg room and had to be pretty inexpensive.
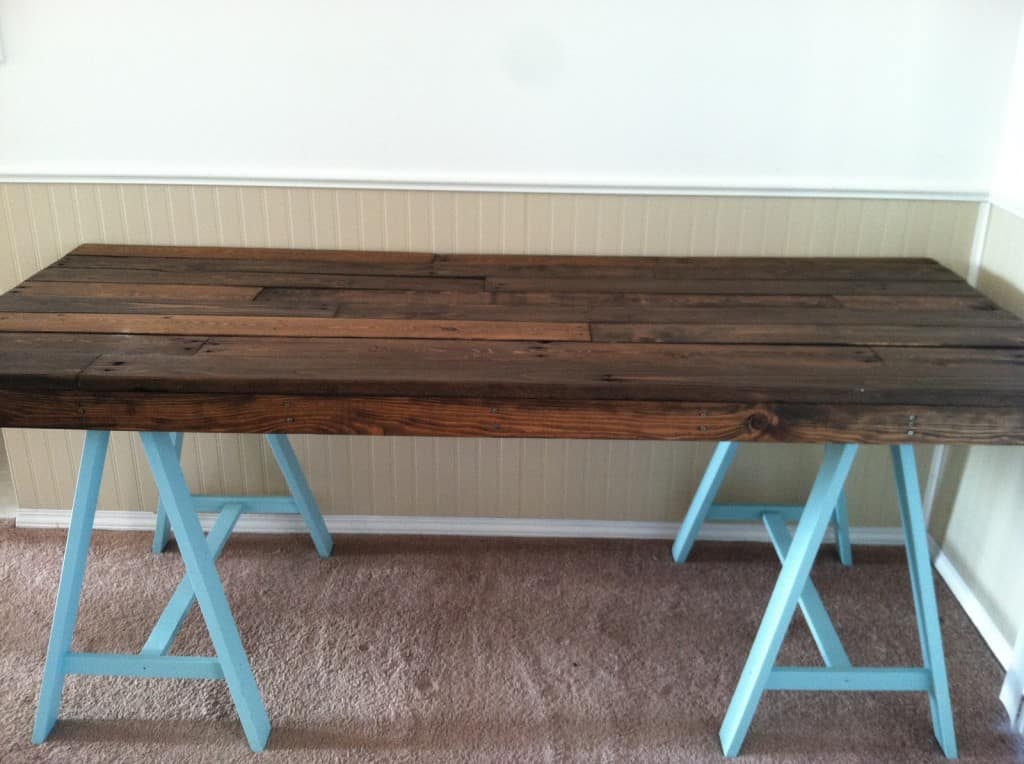
The second inspiration was this desk from Unfinished Finds. Of course I was drawn to the turquoise sawhorse legs but I also liked the rich color of the wood and the slightly more finished look.
I also love the way this style of desk feels more like a craft or drafting table then just an ordinary office desk. My office/studio space is connected to my master bedroom so the last thing I want is for it to feel like a corporate office area. I want it to be comfy, unique and representative of the rest of the style throughout our home.
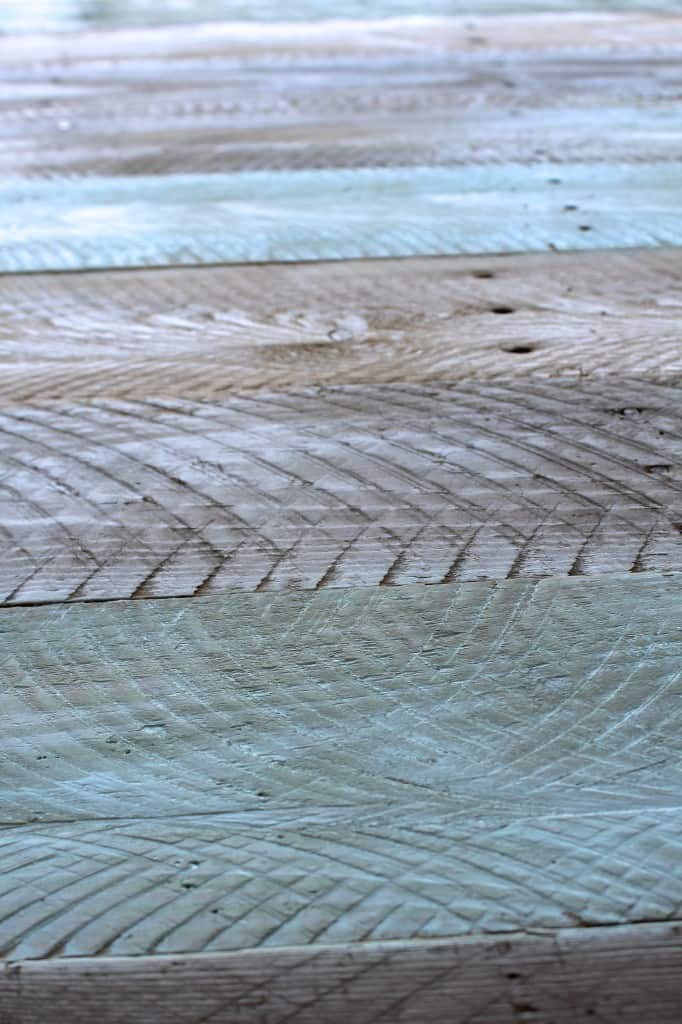
When I decided on using pallets I also decided that I wanted to buy as few products as possible and I wanted to keep the texture and unique quality that pallet boards offer. And in order to stick with the coastal theme in our home I decided to paint the boards but I wanted them to still feel weathered with a driftwood look to them.
So I set off to find some free pallets and I found several sources on Craigslist and a few from other places. My son may or may not have nicknamed us the Pallet Pirates :)
I also searched for some cool free sawhorses but after weeks of searching I never lucked out on any. I found several options at Ikea and Home Depot and I ended up going with these galvanized steel ones from Home Depot. Now the wheels were really turning…mixing weathered pallets boards with galvanized steel, yes!
Here is the tool and supply list:
- Pallets: I used two free pallets
- 2 galvanized steel sawhorses: $17.97 each from Home Depot
- Wood screws
- Corner brackets: from Home Depot but I can’t find them online. I believe they were about $2.50 each
- 36″ x 72″ plexiglass sheet: Lowes $54.98
- 2 6ft 1″x2″ pine boards: Home Depot, $3.58 each
- 1 8ft 1″x2″ pine board: Home Depot, $4.72
- Wood shims: I had a pack left over from our advent tree
- Liquid Nails or other wood glue
- Clamps
- Old rag or towel
- Any old paint or stain you have laying around in your garage
- Nailer and 1 1/2″ nails
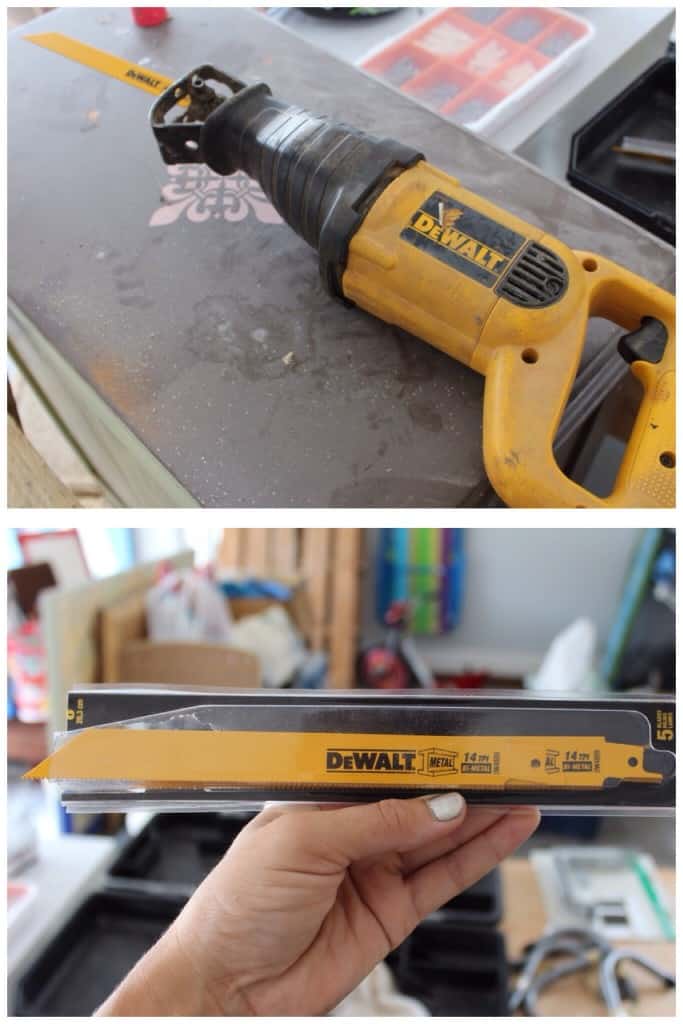
- Reciprocating saw with blades to cut metal and wood
- Compound miter saw
- Electric sander and sand paper: I used 180 grit because that was what I had in my garage but you could use any
- Drill
Steps:
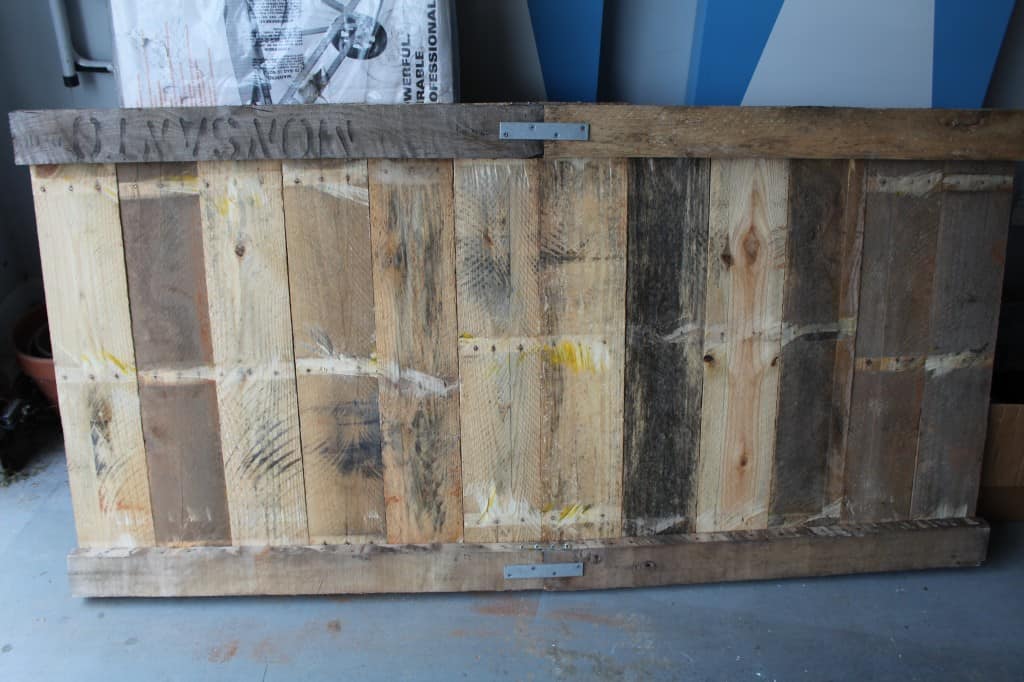
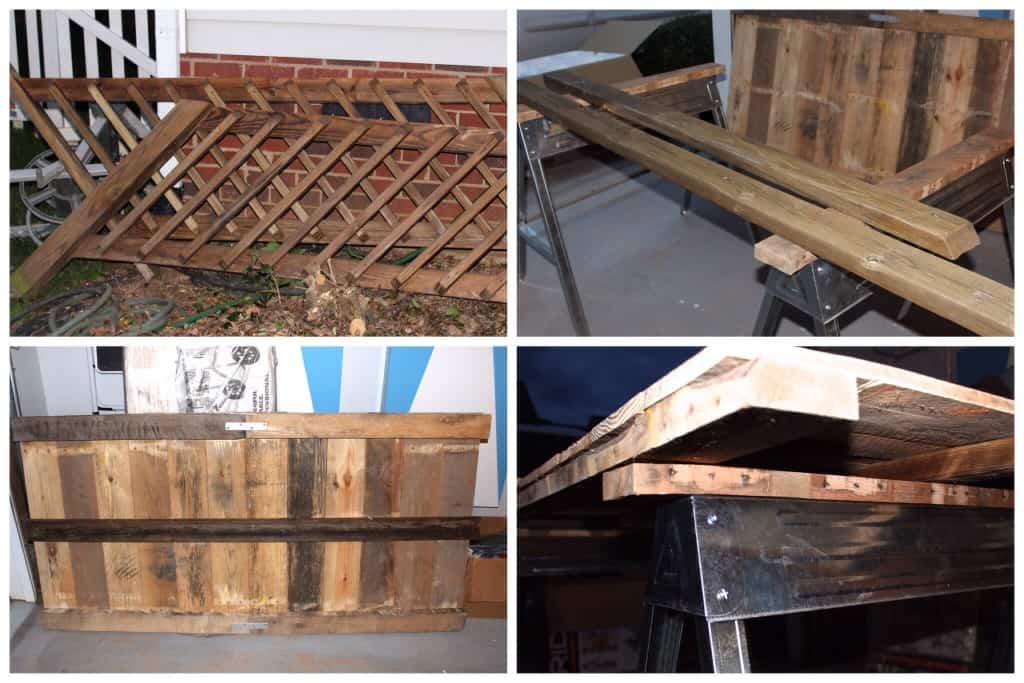
Once I found pallets that were in decent shape I started disassembling them with the reciprocating saw. I slid the saw blade between the boards and cut directly through the nails. I had read enough online to know that it was nearly impossible to remove the nails by hand.
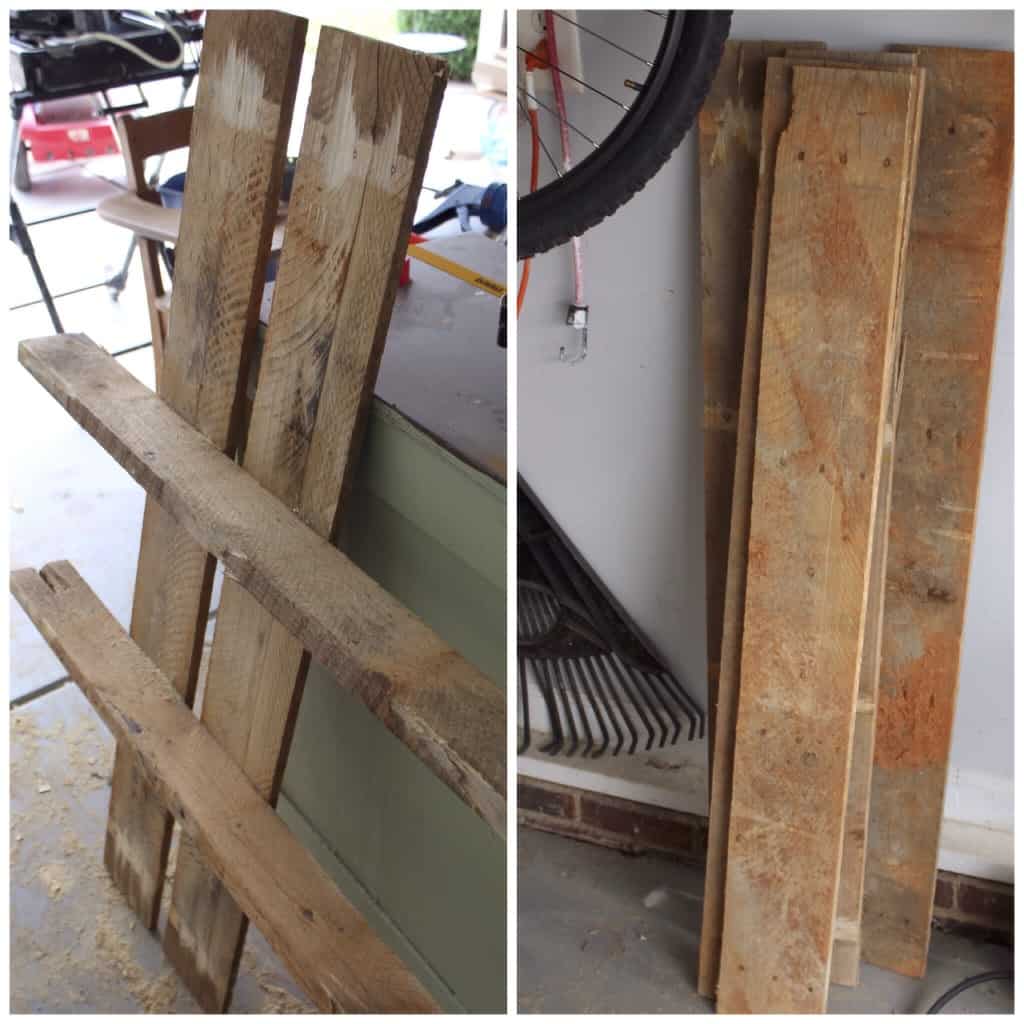
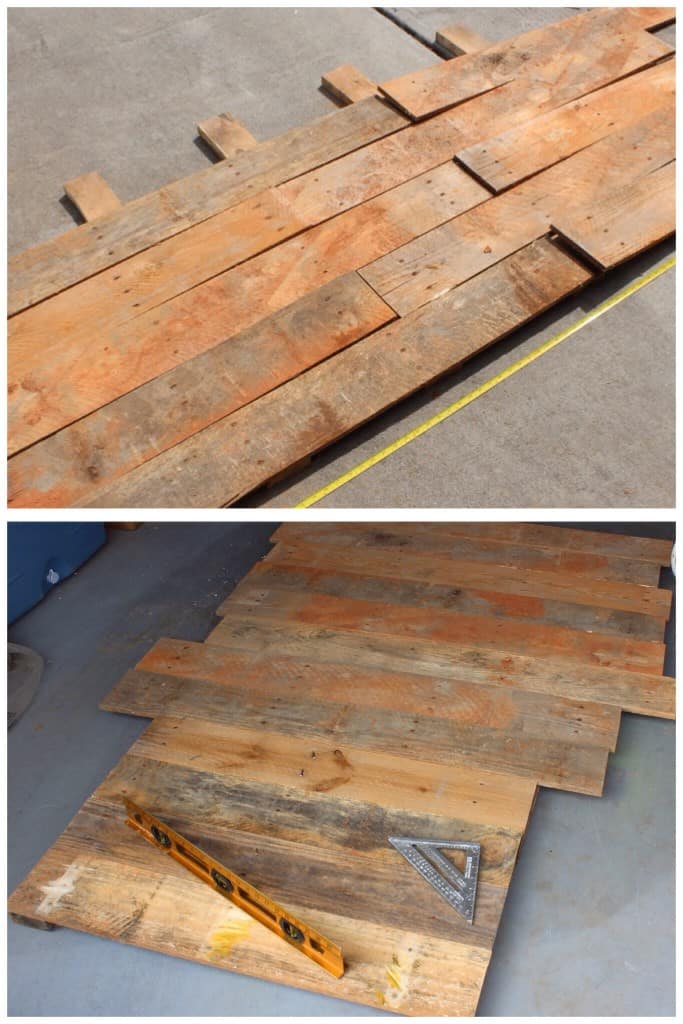
At this point I had not decided exactly what size I wanted to build the desk so I started laying the pallets boards out in different patterns. I decided that although I liked the staggered look it would be much easier to build the desk top with the boards laid out vertically, side by side.
Also, when I was researching what to put on the top of the boards I realized that glass was too expensive and most home improvement stores carried plexiglass in standard sizes. I found a pre-cut plexiglass sheet at Lowes for $54.98 that was 36″ x 72″ which would make a HUGE desk. But in the end my space could fit that size and it just made everything more simple and less expensive to go with a standard size.
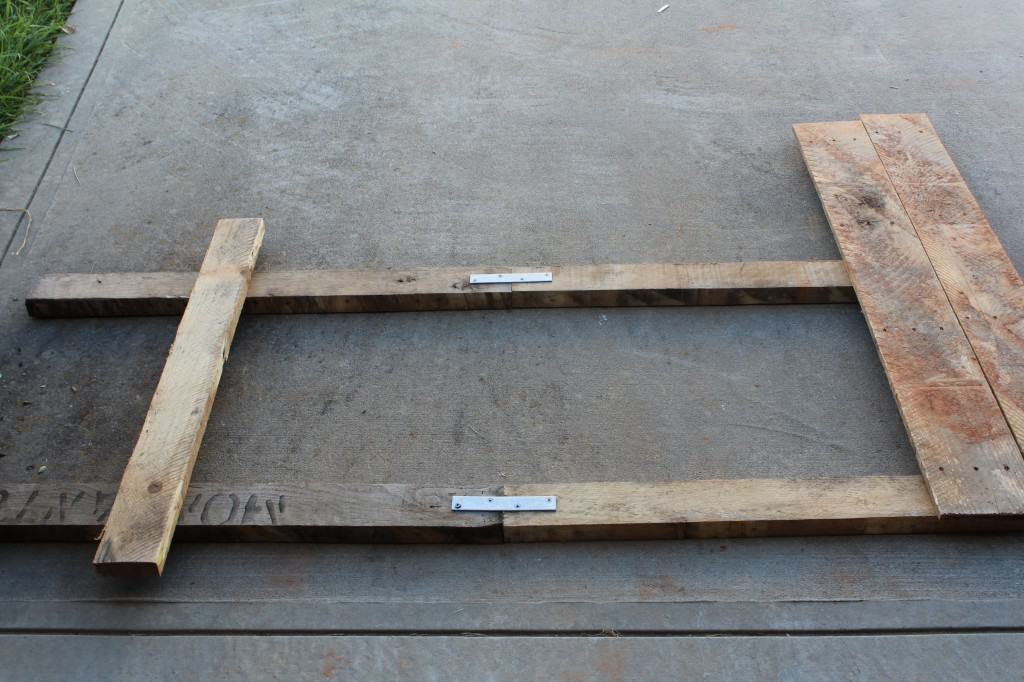
Once the size was decided upon I had to figure out how to build the top. If you have ever seen a pallet you know that the boards are connected usually with 2″ x 4″ boards or a similar size. On my pallets, the 2″ x 4″ boards were exactly 36″ long so I realized that if I connected two of them I would have a 72″ board and I could use these as my base boards to build the top.
I connected them with mending braces and wood screws. The screws were hard to screw in my boards so I ended up putting a mending brace on the top and then one on the side but you can do whatever works best with your wood.
I knew I would need more support in the middle but I was figuring this out as I went so I wasn’t quite sure yet what I would use.
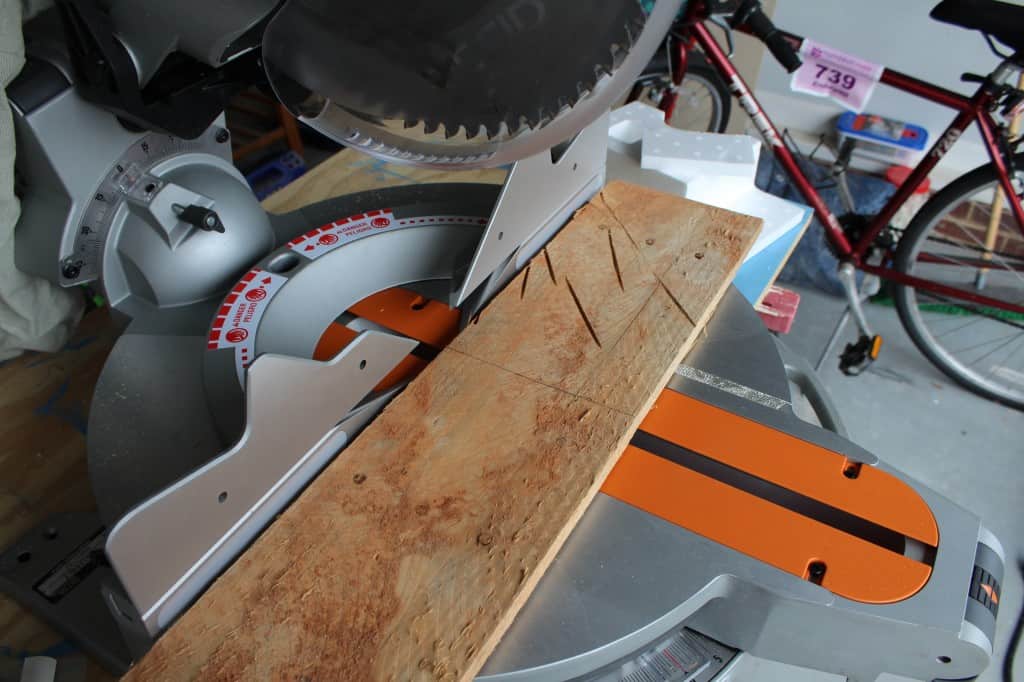
Then I cut my pallet boards to size with my miter saw, flipped the base boards over so that the metal brace was facing down and laid them across the base boards.
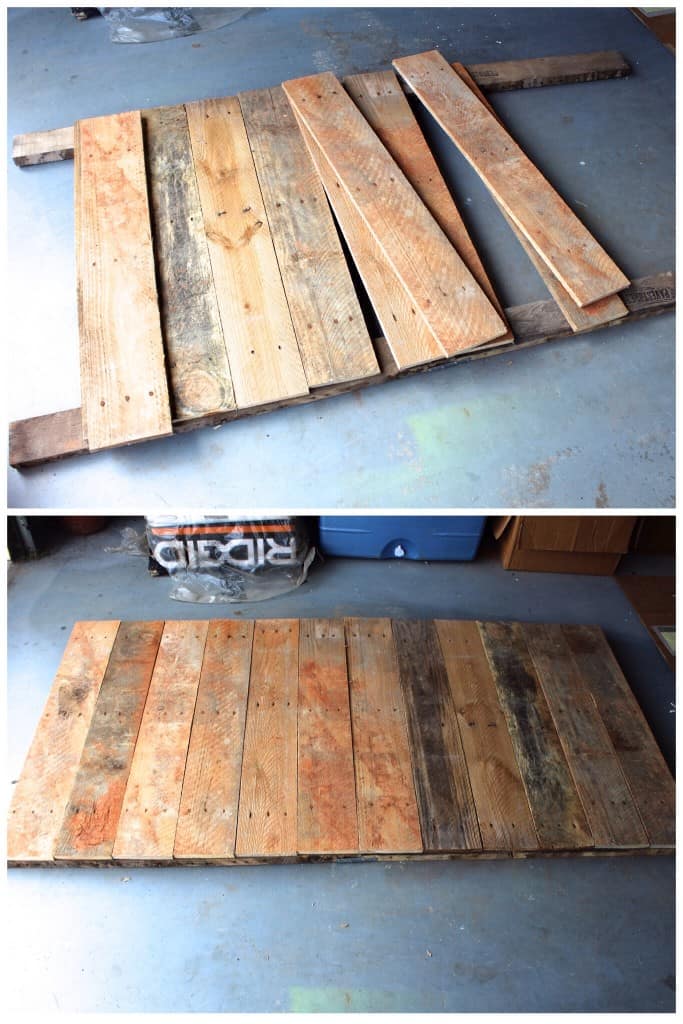 Once I had the boards where I wanted them I nailed them to the base boards with my nail gun. Here is the underneath so you can see what it looks like.
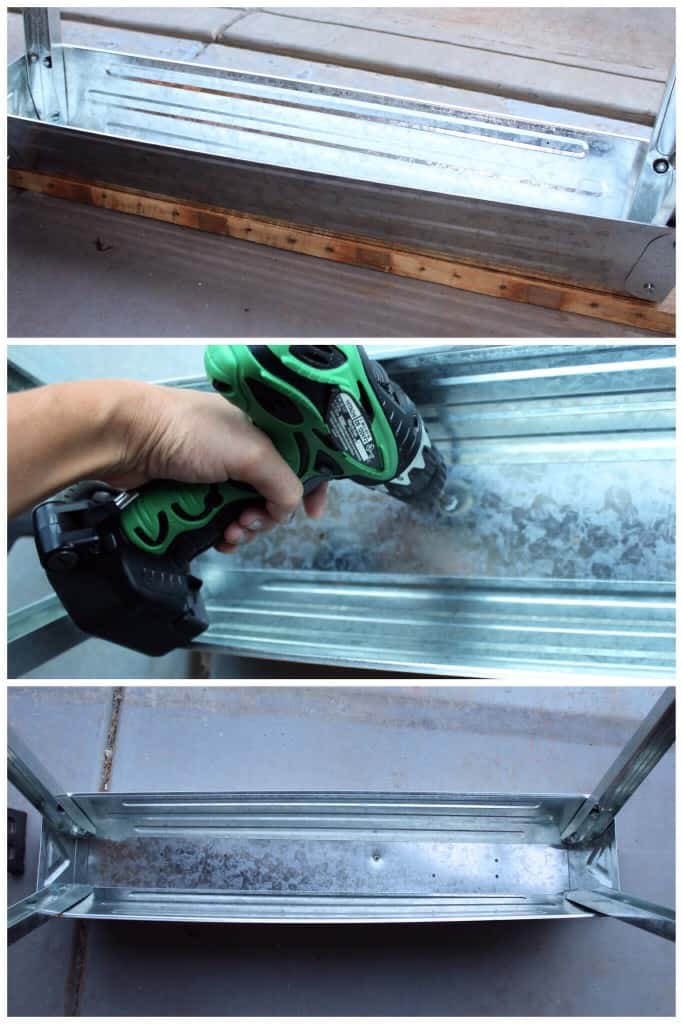
For the sawhorse legs I screwed another 36″ long 2″ x 4″ board to the top of each sawhorse for support. The great thing about the galvanized sawhorses is that they came with several holes in the top of them already which made it super easy to screw the boards on top.
I laid the board on the ground and flipped the sawhorse upside down on top of the board and attached it with wood screws.
I flipped the tabletop over and set it on the sawhorses to see how it was going to look. Then I went searching for a middle support beam. I was out of pallet wood so I decided to use a board from my outdoor steps that we had taken down when we built the deck. The boards were a little longer than 72″ so I cut them to size with the miter saw.
Once I had the top built it was time for cleaning, sanding and painting. I washed the top with the hose pipe and let it dry out completely. Then I lightly sanded the top and the edges so it would be smooth, but not to much that it lost the texture and the look of the wood.
I grabbed four pots of sample paints that I had in my garage, Simple Stylings coastal colors :), and free hand painted the boards. I wanted the wood to look weathered and beachy so I decided to water down the paints a little. Then I painted it on with an old brush and wiped off any excess and the boards really soaked up the color.
Also, I wasn’t too careful about keeping the colors separate between each board as I wanted it to look natural. I overlaped the colors just a little and blended them with my rag.
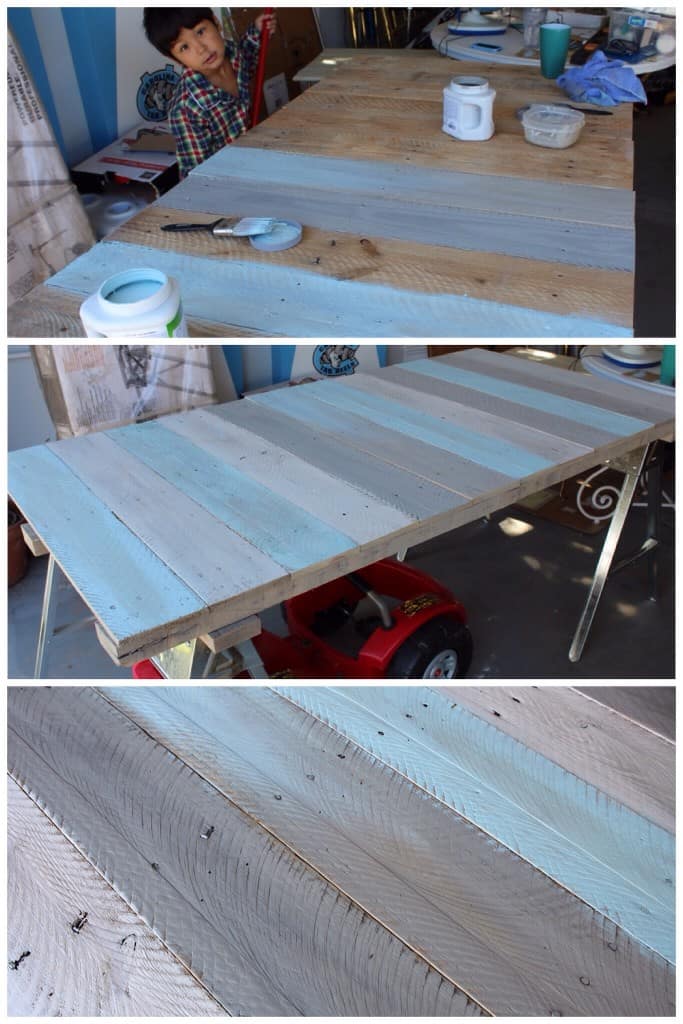
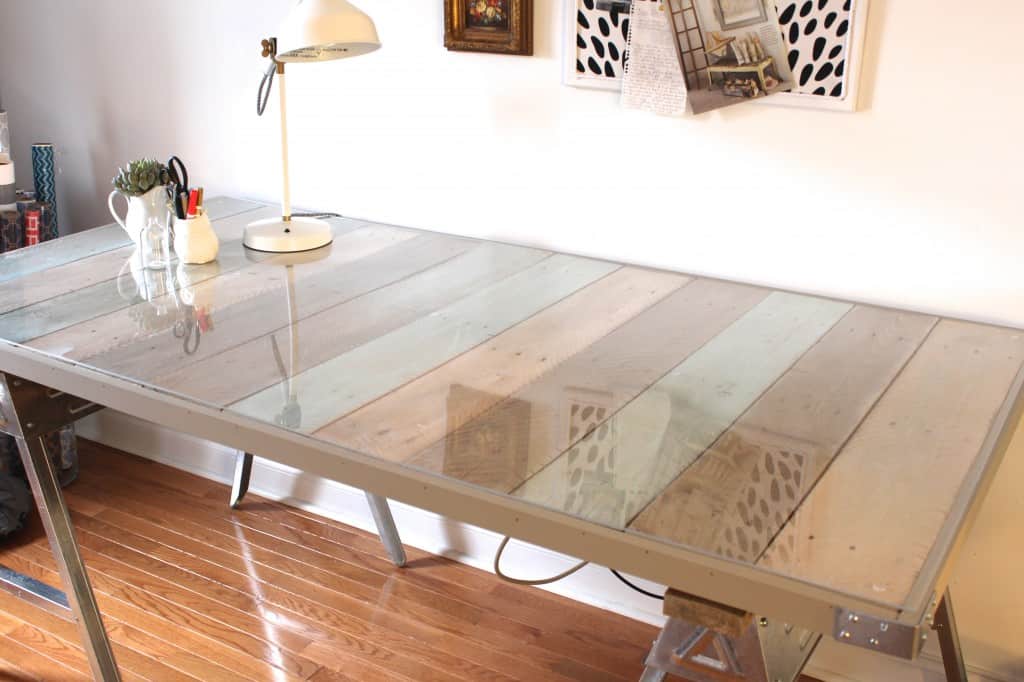
I loved the way the colors turned out. The light in my garage isn’t the best but the actual finished product looks more like the picture below. I love how you can see the texture and the nails!
I was in desperate need of the use of my desk so I decided to go ahead and move it to my office and complete the finishing touches inside.
I put the plexiglass on top and put a few clear rubber stoppers underneath the plexiglass so it would sit evenly on the wood and not get too scratched underneath.
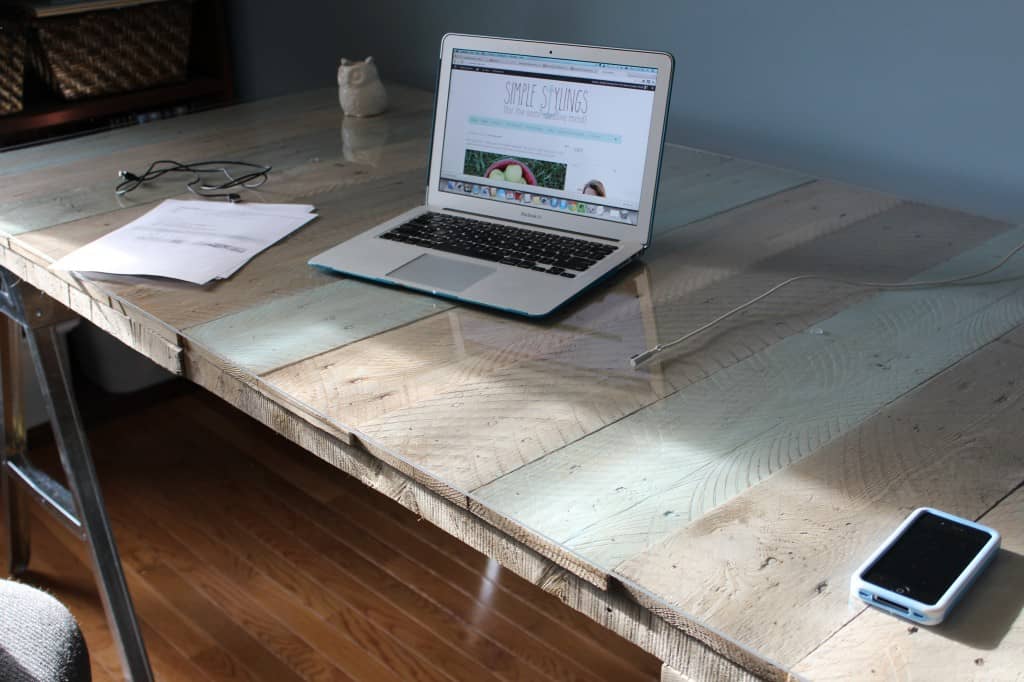
One unusual decision I made about halfway through this project was not to secure the tabletop to the sawhorse legs for several reasons. First of all the desk was so big it would be nearly impossible for me to get it upstairs as one piece. Secondly, since I decided to make the desk so large I wanted to have the flexibility to use it for another purpose later on, perhaps a dining table.
But you could easily bolt or screw the tabletop to the boards attached to the sawhorses.
Once I got the desk upstairs and the plexiglass on I used it for awhile to give myself time to decide if or how I wanted to finish the edges. One thing I learned about working with pallet wood is that most of the boards are a little uneven or crooked but that is what I ended up loving about it.
I didn’t want it to be perfect, I wanted it to be unique.
After a couple months though I did decide I wanted to finish the edges so it would have a more finished look. Unfortunately I didn’t have any wood left that would work so I did end up buying the 1″ x 2″ boards from Home Depot. I bought two 72″ long 1″ x 2″ boards for the long sides and one 96″ long 1″ x 2″ for the shorter ends and had the folks at Home Depot cut the longer board to fit the two shorter sides of the desk.
There were some gaps between the ends of the pallet boards and the 1″ x 2″ boards so I filled the spaces in with a few woods shims. The shims were a bit too long so I used an X-Acto knife to score the shims and snapped them apart with my hands to get them the size I needed. Then I added a little glue and clamped them on for a few minutes. Then I nailed the 1″ x 2″ boards to all four sides of the tabletop with my nail gun.
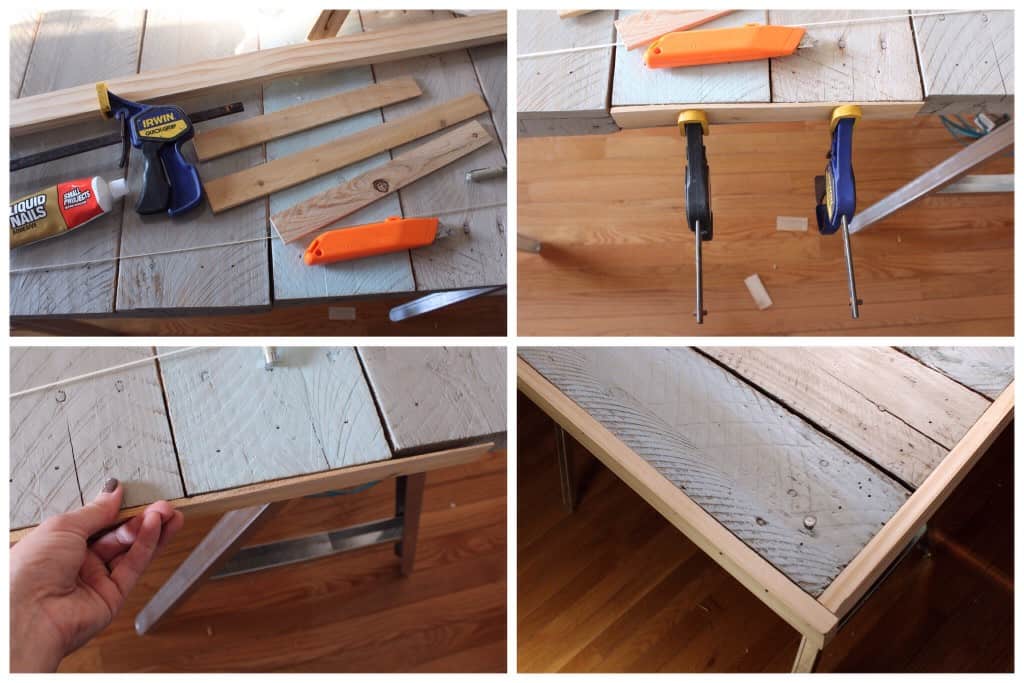
I had to saw off the ends a little with my reciprocating saw (blades for cutting wood) because again, everything was a little uneven and needed slight adjustment due to the pallets. If you cut all of your pieces exactly or had a precise plan mapped out ahead of time you might not need this step.
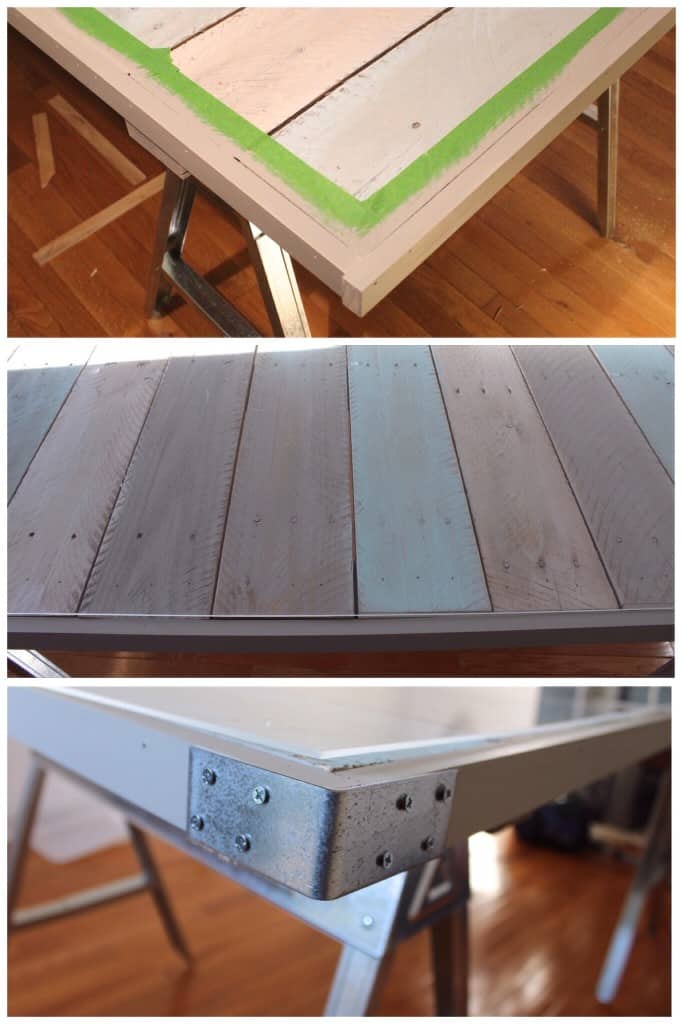
Then I painted the edge pieces with the “greige” color that I used on the table top.
I found four galvanized steel corner brackets at Home Depot that were 2″ wide (the same as my boards) and I drilled them into the wood on each corner with wood screws. I loved using the brackets because it allowed me not to do any special, angled cuts where my edge boards meet and they tied in the sawhorse legs perfectly. And, it made the corners rounded for safety too!
The only thing I would have done differently I think is to use 1″ x 3″ boards for the edges instead of 1″ x 2″ boards. I had forgotten to measure before I went to Home Depot and didn’t consider the base boards underneath but I think the 1″ x 2″ boards are fine and I wasn’t about to waste any money :)
All in the desk cost me about $113 for materials because I owned or borrowed the tools I needed. It wasn’t a “free” desk but for the size and the fact that it was completely customized to how I wanted it I thought this was a pretty good deal.
I do love the desk so much and I am really proud of how it turned out. I hope you like it as much as I do!
And that’s a wrap! This might be my longest post ever but I wanted to get all of the details down for you. Feel free to leave me a comment if you have any questions! You can also find the desk reveal post here.
I hope you all have a wonderful week and thanks so much for stopping by!
I am linking this post as part of an awesome contest hosted by Monica & Jess over at East Coast Creative called Creating with the Stars!

12 contestants will be chosen and paired up with pro bloggers for some major DIY competition so head on over there and check it out and share it with your peeps!!! The more you click over and share the more chances Simple Stylings has to win! Thanks for the support y’all!
I’m also linking this post up with Tatertots & Jello’s Link Party Palooza

and Best of the Nest with Jennifer from Dimples & Tangles and several other awesome ladies!!!

and East Coast Creative’s link party!!!
and with Funky Junk Interiors Reclaimed Wood link party!!

And at Thistlewood Farms!
Head on over and check out all the amazing projects in these link parties!

I’m amazed, I must say. Seldom do I come across a blog that’s both educative and amusing, and without a doubt, you’ve hit the nail on the head.
The problem is something which too few people are speaking
intelligently about. I’m very happy that I came across this in my search for something relating to this.
Your desk is great! How is the plexiglass holding up over a year later? Scratches? Stains? Thanks for sharing!
Hi and thank you so much! My plexiglass has held up just fine so far!! I haven’t noticed any major wear and tear. Hope that helps :)
this came out great– the texture and colors are perfect! :)
Thanks so much Stephanie!!!
I love your desk! It looks great!
Thanks so much Jen!!
Great job !!! Love all the colors you used on the boards. Could you possibly give me the names, please? I love all the sea glass colors.
Thanks so much Debbie! Yes, I will grab the colors for your and shoot you an email :)
Hi Debbie! The colors are all Sherwin Williams. Watery, Accessible Beige and Fawn Brindle. I diluted all of them a little bit with water :)
Can I tell you how impressed I am? Very! Your desk is amazing! I love the colors that you used on it and the finished edge is perfect! So well done!
Thank you so much Kris! That means a ton! Thanks for stopping by and for hosting!!
Many thanks. Ample data!
Wow Summer, I’m blown away, that is SO impressive!!! You did such an incredible job figuring out how to get exactly what you wanted, and I LOVE the color! I’ve always thought Donna’s desk was fabulous, too! Thanks so much for sharing at Best of the Nest!!
Thanks SO much Pam! I love Donna and her desk is amazing and truly inspired mine! Thanks so much for stopping by and hosting the party!
I loooove your new office desk, I have a couple of old doors and really want to do something like this, you have put so much work into it it looks amazing! well done x
Thanks so much Carla! Ooh, old doors would work great! I appreciate you stopping by!
You ARE good with tools! Love this desk and your interpretation of the inspiration desks. I like you thinking about not attaching the legs and maintaining your future options!
Thanks so much Cathy! I really appreciate you stopping by and checking it out :)
Summer, you are so inspiring!!! I love how you MADE a desk because you couldn’t find what you wanted. That is so awesome!! The galvanized legs and the the corner brackets, coupled with the driftwood looking, rough hewn wood, is such a great combination, I couldn’t love it more. The plexi top gives it a bit of glam and functionality, that was the perfect touch. I want to make this!! Thanks so much for sharing your detailed tutorial, I am going to pin for a later date!! Thanks also for linking to Best of the Nest, I’m so glad to meet you and your blog.
Thanks so much Lisa and thank you for hosting! I love this link party but this is the first time I have linked up! You guys are amazing and a great group of projects! Thanks again for reading about my desk, I loved building it and still can’t believe I did :)
Summer, I’m back again to check out your desk and show it to my husband. You’ve pretty much got me obsessed with finding myself a pallet now :). I’m so inspired. I’m going to share this next Friday for Best of the Nest features!
Oh my goodness Lisa, thank you SO much! Once I let go of the idea of wanting the desk to be perfect I had so much fun building it to fit our style. I am humbled by your sweet comments!! I love the Best of the Nest party and I thank you guys for hosting. Such great talent!
WOW! This desk is incredible. I love how it’s the perfect mix of shabby chic and modern. Absolutely gorgeous!! I’ve got serious desk envy now!
Aww your too sweet Erika! I’m glad you like it and thank you so much for stopping by!
I love the colors you used! I have been searching for a desk to thrift or an idea for a diy one so thanks for the inspiration! I don’t have much room in my apartment, so I’m thinking of a pretty narrow desktop. Maybe I’ll go the pallet route…hmm, so many ideas. I’m following your social channels so I can keep up with your future posts!
Thanks SO much Emily, I’m glad you’re here! This was the first time I have worked with pallets and they really do offer so much possibility!
It looks so good Summer and fits perfectly with your coastal style! I’m majorly impressed by your use of power tools too! :)
Ha! :) Thanks! I love working with the power tools!
Wow! Your desk turned out beautiful and I love the colors that you painted the pallet wood!
Thank you so much Katie!!!
I adore the first photo and styling. I love the floral prints paired with the modern black and white fabric and your gorgeous desk. That lamps is so pretty too.
Thanks so much Julia! I think we are blogging at the same time in the mornings :)
I am going over to click now :) Great job- you know I love those ocean-y colors!
Thanks so much Beth!!!
You are have serious skills, girl! It’s gorg!!!!
Thanks girl! You’re too sweet!
I didn’t even realize you had covered it in plexiglass…brilliant…and I’m so glad you entered this in creating with the stars!!!! Go Summer!!!
Thanks Jen!! I would be so amazing to win a spot :)
That’s so pretty! I would never guess it’s a DIY. Good luck in CWTS!
Thank you so much Katherine! I really appreciate it!
Looks cool! I really like how the gray border around the edge and the metal brackets give it sort of an industrial look. If I ever get rid of my monstrosity of a desk I’ll have to think about one of these. ;-)
Thanks Kris! I was worried about how it was going to turn out :)